
This chapter will explain how to interface between an external system (e.g. ERP) and ROB-EX using the CSV 2+3 integration module.
It is possible to transfer data both ways.
Data possible to transfer with CSV 2+3 interface
- Resources
- Resource calendar
- Products and raw materials
- Projects
- Production orders
- Operations
Interface developers are encouraged to initially focus on these subjects:
- Read the PDF document ROB-EX CSV II integration.pdf. This document describes both how to initially create the ‘GanttERP’ database and also what data must be filled in including a full use case example.
- Use the PDF document ROB-EX XML integration.pdf. This document can serve as a reference to get more in depth information of the different table fields. Referring to the previous Integration overview chapter, then data imported using the CSV interface are internally inside the ROB-EX client converted into XML and piped through the XML import interface.
The user can manually activate the exchange or a macro can be created that automatically imports a CSV file at start-up of the client or automatically when a new or changed file is detected. Please refer to chapter TextIO Plugin” for a description of the macro function.
In the following chapter you can read about:
- Manual activation of CSV import and export
- Using the TextIO Plugin macro
- Setup the TextIO Plugin macro
Manual activation of CSV import and export
Import
- Start CSV import by selecting either:
- The text file import button in the toolbar or
- Text file MRP2/3 import in the menu Files – Import.
Please notice that the button in the toolbar is a list where the last selected function is shown on the button.
- In the window “Open import file” select the file to be imported. ROB-EX shows automatically the folder where a file was imported from last time. Please notice that sometimes the import data is placed in two files:
- A file containing data that is not often changed, e.g. data for resources and resource calendars.
- A file containing data for operations, routes and orders.
- Select the file and press Ok. The data are now imported in to the current plan.
Export
- Start the CSV export by selecting either:
- The Text file export button in the toolbar or
- The Text file MRP2/3 export button in the menu Files – Export
Please notice that the button in the toolbar is a list where the last selected function is shown on the button.
- In the window “Export to…” select if you want to export to all orders or only orders that has been changed since the last export.
- Select name of the file to export to. The last selected file name is shown.
- Press Ok. The order list is shown. If the option “Export changes” is selected, the order list shows only the orders that have been changed since the last export.
- Mark the orders to be exported. Use the filter function to filter the orders.
- Press “Export selected order” to export the orders to the specified file.
Using the TextIO Plugin macro
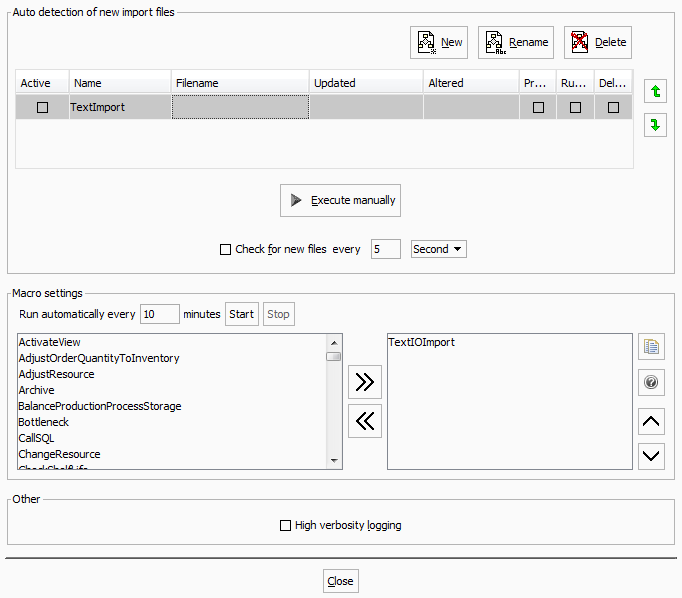
The auto detection settings will enable automatic import of CSV files when files have been changed. A file change could be that a new file is created in a specified directory or a named file is created or updated. To enable the automatic import create one or more macros using the “New” button and assign either a directory pattern or a named file the macro will monitor. Once the file(s) have been detected as changed the macro lines (configurable) added to the macro will be executed.
By creating multiple macros the auto detection feature can monitor the change of multiple files in different locations.
The following paragraph is a guide in how to setup a macro
Setup the Textio Plugin macro to import a file
- Select “Settings – Textfile Plugin (CSV 2+3)” in the Functions->Settings menu.
- Make a new macro by pressing the “New” button.
- In the dialogue “New macro” enter the name of the macro. Press the “Ok” button.
- Double click on a macro in the macro list in column “Filename” to select the file to be imported. If clicking “Open” in the file chooser when a directory is selected, you will be prompted to enter a file pattern. Alternatively press “Open” when a single file has been selected
- Set up the macro to check for new version of the import file. Put a check mark in the field “Check for new files…” and enter how often the macro must check for new version of the file in the field to the right.
- Optionally add additional macro lines from the left list of built in macro line commands. See Macro editing for details on available macro commands.
- Activate the macro by setting a check mark in the field “Active” next to the macro.
- Test the macro by pressing the button “Execute manually”.
Post your comment on this topic.