
This chapter will explain how to interface between an external system (e.g. ERP) and ROB-EX using the XML integration module.
It is possible to transfer data both ways.
Data possible to transfer with XML interface
- Resources
- Resource calendar
- Products and raw materials
- Projects
- Production orders
- Operations
- BOM information (linked to operations)
- Links between production orders (sub order relations ship)
- Document links
- and much more…
Interface developers are encouraged to initially focus on these subjects
- Read the chapter XML minimal example, which includes a hands-on tutorial that will get you started quickly. This chapter also contains additional exercises that will help interface developers to explore the more complex areas.
- Download and investigate the examples available in ROB-EX_XML_resources.zip. This file contains XSD validation schema and ready-made examples.
- Read the PDF document ROB-EX XML integration.pdf. This document explains in detail how to create legal ROB-EX XML interface files. This document also contains comprehensive examples.
- If using an ETL tool is of interest, then watch the videos on Talend Open Studio.
The user can manually activate the exchange or a macro can be created that automatically imports an XML file at start-up of the client or automatically when a new or changed file is detected. Please refer to chapter Setup the XML Plugin macro” for a description of XML Plugin macro.
Manual activation of XML import and export
Import
- Start XML import by selecting either:
- The xml file import button in the toolbar or
- ERP XML import in the menu Files – Import.
Please notice that the button in the toolbar is a list where the last selected function is shown on the button.
- In the window “Open import file” select the file to be imported. ROB-EX shows automatically the folder where a file was imported from last time. Please notice that sometimes the import data is placed in two files:
- A file containing data that is not often changed, e.g. data for resources and resource calendars.
- A file containing data for operations, routes and orders.
- Select the file and press Ok. The data are now imported in to the current plan.
Export
- Start the XML export by selecting either:
- The XML export button in the toolbar or
- The ERP XML export button in the menu Files – Export
Please notice that the button in the toolbar is a list where the last selected function is shown on the button.
- In the window “Export to…” select if you want to export to all orders or only orders that has been changed since the last export.
- Select name of the file to export to. The last selected file name is shown.
- Press Ok. The order list is shown. If the option “Export changes” is selected, the order list shows only the orders that have been changed since the last export.
- Mark the orders to be exported. Use the filter function to filter the orders.
- Press “Export selected order” to export the orders to the specified file.
Selecting export encoding format
By default the encoding format used when exporting XML files from ROB-EX will be UTF-8. You should consider changing the format if the destination ERP is not correctly displaying text imported from ROB-EX.
The currently selected format can be investigated by opening the generated XML document with a text editor (e.g. Run->Notepad.exe) and check what encoding is specified in the top of the document. Typically it would read:
<?xml version="1.0" encoding="UTF-8" standalone="yes" ?>The encoding used during export can be changed by adding the option -Dgantt.XMLEncoding= as parameter on the shortcut used when starting up the ROB-EX client. A list of valid encodings is available from http://www.iana.org/assignments/character-sets
Changing export max line length
Some ERP systems have a limit on the number of characters allowed per line when importing XML files. The length of the exported lines can be controlled in ROB-EX by editing the file custom\GanttSetup.properties appending the following lines
# The max line length (in characters) that the XML file should be written with
# Set to -1 means that there is no limit
# This attribute cannot have a value less than 100
maxXMLLineLength=-1
Also refer to the chapter Miscellaneous configurations.
Using the XML Plugin macro
Use the XML Plugin module to make a macro for automatic import of text files.
In the following chapter Setup the XML Plugin macro” you are guided in setting up the macro.
The following functions are available:
- Open a specified Gantt plan (OpenFile),
- Start an external program (RunExternalProgram),
- Import a text file (TextIOImport, it is possible to import more files in the same macro by using a filter. Reads the oldest first),
- Delete a text-file after it has been imported (DeleteFile),
- Save the plan with the imported data (SaveAs),
- Close ROB-EX (ExitProgram).
Click on…if you want to…
| Click on… | if you want to… |
|---|---|
| New | Make a new macro |
| Rename | Rename an existing macro. Select the macro in the macro list. |
| Delete | Delete an existing macro. Select the macro in the macro list. |
| Execute manually | Start a macro manually. Select the macro in the macro list. |
| Move up/down | Change the order the macros are executed in. If more than one macro in the macro list, use this function to decide the order in which the macros should be executed in. The import of data must be done in the following order:
|
| Add command | Add a new macro command to a macro. Select the macro in the macro list. |
| Remove command | Remove a macro command from a macro. |
| Active | Activate a macro. The auto-detection function runs the macro next to it is true. |
| Prompt | See a message before the macro is executed. |
| Filename(in the macro list) | Select a file or folder to be imported.
|
| Check for new files | Activates auto-detection of new files at the specified time interval. |
| Run at start-up | Executes the macro when ROB-EX is started. |
| Close | Ends the macro setup. |
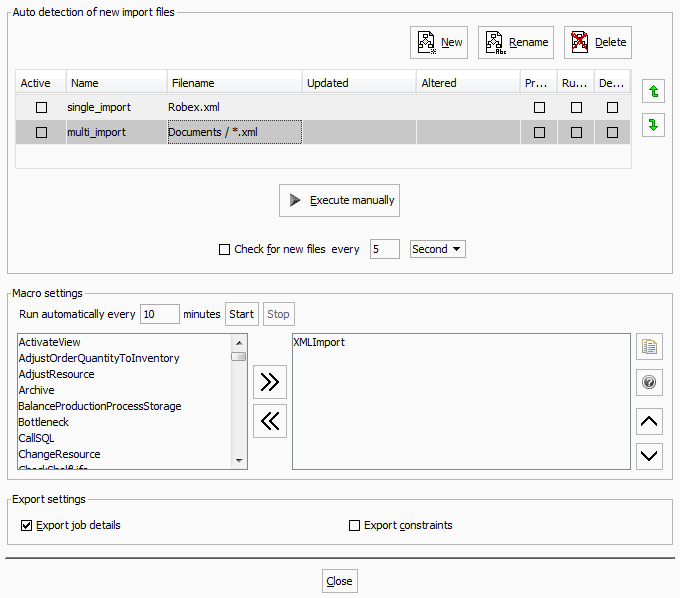
Setup the XML Plugin macro
Importing a single file
- Select “Settings – XML Plugin” in the Functions menu.
- Make a new macro by pressing the “New” button.
- In the dialogue “New macro” enter the name of the macro. Press the “Ok” button to make a new macro.
- Double click on a macro in the macro list in column “Filename” to select the file to be imported.
- In the “Open” dialogue select the file to be imported during execution of the macro.
- Set up the macro to check for new version of the import file. Put a check mark in the field “Check for new files…” and enter how often the macro must check for new version of the file in the field to the right.
- Activate the macro by setting a check mark in the field “Active” next to the macro.
- Test the macro by pressing the button “Execute manually”.
Importing multiple files based on file pattern
- Make a macro as described above.
- Double click on the macro in the column “File name” to select the import folder.
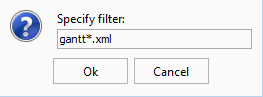
- Enter a folder filter. In the example below all files starting with “gantt” and file type is “xml” are imported.
- Activate the macro.
Post your comment on this topic.