
The Gantt chart in ROB-EX Scheduler combines the graphical Gantt chart overview with tools making it easy to change and simulate operations and production orders. This is an overview of topics covered in this first section:
- The Gantt chart
- Frequently used Gantt chart actions
- Changing the list of visible resources – resource views
- Frequently used right click actions
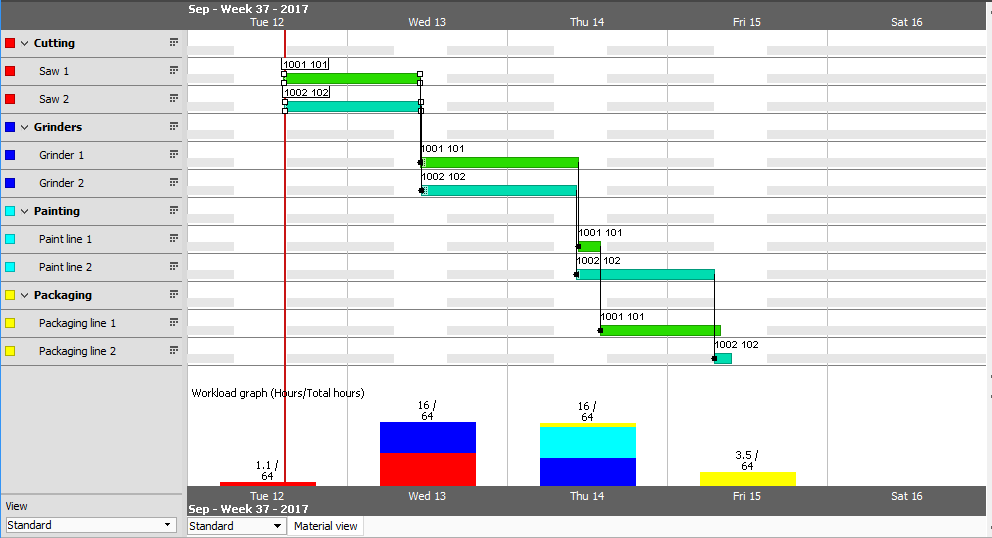
- The bottom graph area
The Gantt chart
An operation is shown as a horizontal bar on the resource the operation currently is assigned to. When an operation is selected, any constraint relation ships to other operations will be drawn. I.e. constraint links to other operations in the same route or constraint links to operations on other orders. This way the planner can visualize any problems an operation may have in terms of finishing late or starting too early in relation to pre- and post-decessors
The “View” menu contains a list of different features changing the appearance of the Gantt chart to suit your personal needs. I.e. show/hide the bar label, show/hide the upper detail panel, change the visual appearance of the shift calendar, color mode of the Gantt chart etc. Read more in the View menu section.
A major design goals of ROB-EX Scheduler is that the user should be able to carry out frequently used functions without having to leave the Gantt chart. Read more about the many different built in functions below.
Frequently used Gantt chart actions
This is a list of frequent actions you would be using while working in the Gantt chart
- Selecting one or more operations
- Moving one or more operations in time
- Change operation to new resource.
- Shorten or extend the duration of the operation
- Using snap settings to adjust operation start and end time
- Change horizon of the Gantt-chart
- View operations for a single resource
- Create a new production order
- Editing resource settings without leaving the Gantt chart
- Delete an order or operation
Selecting one or more operations
An operation is selected when there are white or red boxes in the corners of the operation bar. Operations can be selected this way:
- To select a single operation simply left click the operation
- To select more than one operation, click and hold the CTRL key and click on the different operations.
- Click and hold in the white area the left mouse button and “draw” a rectangle around the operations. All operations within the rectangle becomes selected.
- Right click on an operation and select Select order, Select all operations before or Select all operations after
Moving one or more operations in time
The selected operations are moved by clicking and holding the left mouse-button while the cursor rests on one of the selected operations. You can then drag the operations to the selected time/date with the mouse.
While dragging, red boxes in the corners and red lines above operation bars, indicates that this operation has booking overlaps with other operations on the same resource.
You can *move an entire production order in one go by first right clicking one of the operations in the order and select the menu item Select order. This will select all operations in the production order. Next simply left click an operation while dragging the mouse.
Using snap settings on operations you can ensure that an operation always start at e.g. whole hours or whole 15 minutes. For details read the chapter Using snap settings” below.
Change operation to new resource
Move an operation to a different resource by first selecting the operation. Then either
- Click on the Resource choose list in the detail bar.
![]()
A list of alternative resources are listed – pick one and the operation will be moved. - Moving by drag and drop. Press and hold the Alt keyboard button while dragging the operation with the mouse. Green corners indicates drop on a valid resource. If operation is dropped on an invalid resource, it returns to the original resource again.
- Right click the operation and the select the new resource in the Change resource sub-menu

Shorten or extend the duration of the operation
The duration of an operation can be increased/decreased directly in the Gantt chart using the mouse.
This feature is by default turned off. To turn it on open the settings window using the menu Functions->Settings->General. Select the Gantt diagram tab and enable the checkbox “Allow change of Gantt bar …..”. Once this feature is enables you can drag the operation bar start or end doing the following:
- Point the mouse marker to the front or end of the operation bar until the mouse pointer changes to the double arrow symbol
![]() .
. - Simply drag (keep the left mouse button down) while moving the mouse to any side. A pop up window constantly informs you about the actual start/end time and how the duration and workload is affected by the change.
 .
.ROB-EX Scheduler will automatically change the end-time so that it is placed within the defined available time however ensuring then operation is ended in open working hours.
Using snap settings to adjust operation start and end time
The snap feature enables you to adjust operation start and end times to eg. whole hours in case an operation start time is being changed in the Gantt chart.
The snap feature can be used when creating express orders (see). This section describes how to use the snap function
- when moving operation in time using the mouse
- when changing the operation length using the mouse
The snap function will enable you to always adjust operation start or end time to
- fixed minute value, i.e. 0, 5, 10, 15 or 30 minutes.
- to a fixed time of day, e.g. 06:00
The snap feature is used in the following way:
- Open the settings dialog Functions->Settings->General and select the “Gantt diagram” tab
- In Snap settings select the snap mode you want to use for start and end times.
- The check boxes “Default when moving bar(s)” allow you to specify if snap should apply to the start or end time when an operation is moved in time.
- Close the settings dialog by pressing Ok
The snap feature is turned on by clicking and holding the SHIFT key while dragging an operation with the mouse. Either
- while moving the entire operation bar
- or while dragging the operation start or end while the
![]() is visible.
is visible.
If the SHIFT key is not pressed the snap feature is not applied.
Change horizon of the Gantt-chart
Changing the Gantt chart horizon is a frequent action which can be accomplished in many different ways.
One way is to use the buttons in the tool bar to change between the different horizons. It is possible to change the horizon from the following:
- 24 hours
- 5 days
- 10 days
- 1 month
- Enter manually – enables you to choose a random horizon in days.
You may also use the zoom-button integrated in the bottom scroll-bar to change the horizon.
Another option is to click and hold the CTRL-key while turning the mouse scroll wheel up/down
Yet another option is to click and hold the ALT-key while left-mouse dragging a rectangle in the white area of the Gantt chart. This will allow you to zoom to any horizon you can “draw” with the mouse. To zoom out click and hold the ALT-key while you right-click anywhere in the white area of the Gantt chart.
p(banner tip) When ROB-EX Scheduler is restarted the latest chosen horizon will be default.
View operations for a single resource
Left mouse-click the left hand side resource button, i.e. one of the buttons in the left side resource list. Now the Gantt chart shows operations for the selected resource only.
Push the resource button again, and you will again be viewing all resources of the current resource view.
Create a new production order
Create a new order in any of the following ways
- Click menu Edit->Order list and click the New button in the tool bar near the top.
- Fill in the required order header data and click OK.
- The new order appears as a new row in the order list and is initially created with status New.
- To add the order to the Gantt chart change the status of the order to Planned, by double clicking the Status cell of the order row.
- Right click in the white area of the Gantt chart and select New order. The window Edit order is opened. The route list is filtered only showing routes in which the right clicked resource is among one of the alternative resources. Follow steps a-c outlined above.
- Create an Express order. This is done by simply pressing the Ctrl key while “drawing” the order directly in the Gantt plan with the mouse. Please refer to chapter Main window – Express order.
Editing resource settings without leaving the Gantt chart
Right-clicking on a left side resource will give you the following options:
- Capacity according to calendar
- The calendar for the resource is activated by choosing Capacity according to calendar. This requires that a calendar has been set for the resource in the Edit resource window. Important: changing this value will recalculate the end time of all operations assigned to this resource
- Edit calendar
- Shortcut for editing the calendar. With this short-cut the Edit calendar window is opened showing the chosen resource. This is used to open the resource-specific calendar
- Highlight
- One or more resources may be highlighted with a yellow background
- Adjust lines
- The operations for the resource may be shown over more lines by selecting Adjust lines. When activated the operations that are overlapping will adjust to more than one line. This option may also be activated in the views. See Creating and editing views later in this chapter.
- Edit description
- Enter a description for the resource or another text that refers to resource in this field. The description will be shown when the mouse is pointing to the resource. Also this description are shown at the bottom of each resource section on selected HTML report Job-list reports.
Delete an order or operation
Delete an order directly in the Gantt plan by selecting any operation of the order you would like to delete. Then press the Delete key on the keyboard.
Select if you would like to delete only the selected operation or the entire order it belongs to. Click Ok to delete the production order or the operation. Note: deleting objects cannot be undone!
Changing the list of visible resources – resource views
What resources to show and in what sequence can be selected from the menu Edit->Views or by right clicking above the view selector in the bottom left of the main ROB-EX Scheduler window and select Preferences.
This opens the “View preferences” dialog allowing you to edit and/or create view.
Views are used to show a part or a group of resources and to see workload for the group of resources.
Resource groups as folders
The resource groups are shown as folders if you have checked the fold/unfold resource groups from Edit->Views->Edit. See also Views below. If the resource groups are folded you may fold/unfold these by selecting the folder icon by the group name.
Order of resources
The order the resources appears in the Gantt chart can be changed by selecting Views in the Edit menu. In the View preferences window it is possible to change the order using the arrow buttons to the right.
Width
The width of the resource list may be adjusted by holding the mouse over the vertical line between the resource list and the Gantt chart. The cursor will change to a double arrow. Click and hold the left mouse key and drag it to adjust the width.
Frequently used right click actions
Right clicking an operation in the gantt chart will allow you to choose among others the following tools:
- Operation adjustment options
- Re-planning production order
- Edit route
- Choose color for operation
- Create relations between sub orders and parent orders
Operation adjustment options
Right clicking an operation in the gantt chart and select one of the “Adjustment” tools
- Left adjustment
- The selected operation is moved to the left starting when previous operation on same resource ends.
- Right adjustment
- The selected operation is moved to the right with an end time when following operation on same resource starts.
- Left adjustment in same order
- The selected operation is moved to the left starting when previous operation in same route/production order ends.
- Right adjustment in same order
- The selected operation is moved to the right with and end time when following operation in same route/production order starts.
The above adjustment tools may also be used if more than a single operation is selected.
Re-planning production order
Right click on one of the operations in the production order you want to replan. Select the menu item Replan order.
The dialog “Scheduling strategy” opens up. Select a planning strategy that serves your need and press Ok. For a closer description of planning rules refer to the chapter Settings for planning”.
Another option is to select the Bottleneck sort menu option. In this mode selected operations are not changed. Only operations ahead or after in the production order route will be re-scheduled.
Edit route
Right click on one of the operations in the production order you want to edit the route for. Select the menu item Edit route.
The dialog “Edit routes” opens up allowing you to add or delete operations in the route, change the sequence of operations or change operation times, capacity etc.
Changes will only affect the actual production order, ie. template routes are not affected.
Choose color for operation
First select in the toolbar, the coloring mode for which you want to change color. I.e. color by production order” or color by route” .
Next right click on the operations you want to change color for. Select the menu item Select color.
A color chooser dialog opens up allowing you to select the new color.
Create relations between sub orders and parent orders
If order A cannot start before an operation on order B has been completed, this will explain how you can create a sub-order relation ship between order A and B. First select a single operation in the sub-order (order B)
Next press and hold down the CTRL key and right mouse click the operation on the parent order (Order A).
Select the menu option Sub order and select Add. A blue line is drawn between the selected operations.
Please refer to chapter Main window – Shortcut menu” for further details.
See notes for an operation
Place the mouse cursor above an operation in the Gantt plan.
The note is shown as a popup text.
As default order number and operation name is shown. It is possible to add free text. e.g. by double clicking on an operation and enter the text in the field Description.
Post your comment on this topic.