
ROB-EX Multiuser enables multiple users to work in the same plan at the same time, i.e. a change made on Client1 is immediately available and visible on Client2.
Each user is assigned a login, a role and the permission to connect to one or more sites. The role of a user defines the users permissions for a site, e.g. permissions to plan or permissions to view the plan. The site defines what plan the user is working on.
This chapter provides information about how a ROB-EX client uses ROB-EX Multiuser and how to configure users and their associated permissions.
Table of content
- User’s manual
- Configuration
- Site configuration
- Adding and editing of local users
- Security rule management – assigning site access and configuring Windows AD rules
- add/edit role for a local user for a specific site
- add/edit role for a Windows AD group for a specific site
- Data security
- Event Storage
User’s manual
System overview
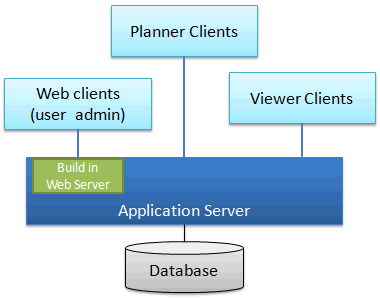
The picture illustrates the architecture of ROB-EX Multiuser.
ROB-EX Application Server
The ROB-EX server communicates and coordinates between all parts in the ROB-EX Multiuser system:
- ROB-EX clients
- ROB-EX User administration
- ROB-EX Multiuser Database
The ROB-EX server controls that:
- users can log on to the Multiuser system with the correct permissions for the specific site and get data from the database
- all clients of a site are updated when a user makes a change to the plan
- the necessary data are read and saved in the database
The ROB-EX server controls updates this way:
When the ROB-EX server register changes in the plan of a site made by a ROB-EX client, the ROB-EX server saves the changes in the ROB-EX Multiuser Database. When the data are saved, updates are send to other ROB-EX clients of that site.
The ROB-EX server must always be running in order for the ROB-EX clients to log on to the multiuser system.
ROB-EX clients
The ROB-EX client is the part of the ROB-EX Multiuser system that a normal ROB-EX user will use on a daily basis.
ROB-EX clients are used for planning and viewing of the plan.
ROB-EX clients can work online connected to the ROB-EX server or offline without any connection. Please refer to chapter Work on- or offline” for further description.
ROB-EX Multiuser Database
All data which are used in ROB-EX are saved in this database.
The ROB-EX server controls that the correct data are read from and written to the database.
The ROB-EX server controls that all data are separated from site to site.
ROB-EX User administration web clients
The ROB-EX User administration is used to edit the users of the ROB-EX Multiuser system.
The ROB-EX Multiuser administration connects to the ROB-EX server through a standard web-browser.
The user administration is further described in chapter User administration.
ROB-EX Web-server
The web-server is build into the ROB-EX Server and supports the creation and modification of users, user permissions and sites.
Using the ROB-EX Multiuser
This chapter describes the daily use of ROB-EX Multiuser.
When the ROB-EX client is logged into the Multiuser server, the user will be connected to a specific site and will only be working on the plan of that site. It is not possible to change between different plans as it is when the user works offline. The buttons New plan, Open, Save and Save as are not enabled in online mode. If the user wishes to work on a plan of another site, the user must log out and log in to that site (given that the user have permissions for the site).
Changes made in the plan by the user is saved the moment the changes are made. When the changes are saved in the database other logged in clients are updated automatically.
Please notice that changes made in the plan is saved in the same moment they are made. If simulations have to be made, it is recommended to use the offline mode. Please refer to chapter Work on- or offline”.
In the following chapters you are guided in how to set up the ROB-EX client to logon to the Multiuser server at startup, chapter Automatic login”. Furthermore you are guided in how to test the connection between the Multiuser server and the ROB-EX client, chapter Test connection and login” and the difference between working on- or offline, chapter Work on- or offline”.
Connect a client to the ROB-EX Multiuser
The section of the manual Functions->Settings->General->Multiuser” explains how to configure the client to connect to the server.
Be aware that the ROB-EX client can be set up to automatically log into the ROB-EX Multiuser server at start up.
on- or offline
ROB-EX Multiuser enables the client to work online with the ROB-EX Multiuser server or work offline without any connection to ROB-EX Multiuser server.
When working online all changes made in the clients Gantt plan are saved immediately in the ROB-EX Multiuser database. The ROB-EX Multiuser server updates the other clients logged on to the server with the same site.
Example: When an operation is moved in the Gantt plan an update is send to the ROB-EX Multiuser server in the same moment that the user let the operation go. If the user edits a field the update is send when the cursor leaves the field and the user press Enter.
In the status line at the bottom of the ROB-EX window the log in status in shown. If the user is logged in (online) the message “Logged in: xx” is shown.
If the user is not logged in (offline), the message “Logged out” is shown.
Be careful using the offline state, as changes in the plan do not lead to updates in the ROB-EX Multiuser database and other clients. It is not possible to automatically update the multiuser database with changes made in the offline state.
Use the offline state if you want to simulate different plans without updating the plan or if you want to bring a “snapshot” of the plan on your PC to a place where you do not have access to ROB-EX Multiuser server. This is possible if you have installed a local license for ROB-EX.
Make a snapshot:
- Log in on the actual plan.
- Log out again using the function “Log out” in the “Multiuser” menu.
- When the status is changed to “Logged out” (shown in the status line) ROB-EX is in offline state. If changes are made in the plan the changes are not update on the ROB-EX Multiuser server.
- Save the plan in a file using the “Save as” function in the files menu.
If the ROB-EX client is set to “Automatic login at startup” (is described above) the ROB-EX client tries to log on the ROB-EX Multiuser server the next time the ROB-EX client is started. If it does it not succeed, an error message “Failed to create Security Manager” is shown.
Press the Ok button. ROB-EX starts in offline state. The last used file is opened if this function is active (Functions – Standard – Open last used file during startup). The status “Multiuser Server off-line” is shown in the status line:
Select “Log in” in the Multiuser menu to log on the ROB-EX Multiuser server (online state).
Instant messages
It’s possible to send messages between users who are online and connected to the same site.
In the menu “Multiuser”, select “Instant message”
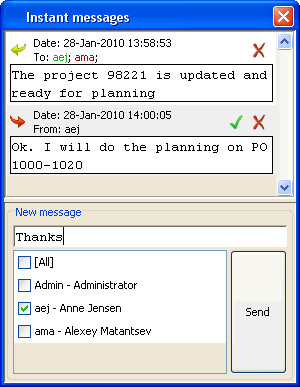
Users who are logged in to the same site is showed in the list. Write a message and select the users to send to and press the Send button. Send and received messages is showed in the list.
Configuration
A user, with ROB-EX Administrator privileges (i.e. has an Admin role), has the possibility to configure, view and edit different aspects of the ROB-EX Multiuser.
This is done from the configuration menu of the ROB-EX Multiuser web-page.
Users access the ROB-EX Multiuser web-page by starting a web-browser and writing the following in the address line:
Replace “localhost” with the name or IP-address of the server where the ROB-EX web-server is running.
Browsing to that address will display the login page, where both local users as well as windows AD users can login. The first time you log on to the User management it can last up to 1 minute before the page is shown.
It is possible for users to login using their windows credentials, this is done by putting a check mark in the checkbox “Windows Authentication” and typing in their windows username and password. It is also possible to define a domain for the user, this is done by defining the domain and the username in the username textfield on the form \. If no domain is defined, the Multiuser will assume that the user is on the same domain as the server.
When a user is logged in and is not active for 5 minutes, the system automatically logs the user out.
Once logged in, clicking the configuration menu item will display a sub-menu, along with a quick startup guide.
The following section will describe the possibilities of the Configuration sub-menu:
- Site configuration
- Adding and editing of local users
- Security rule management – assigning site access and configuring Windows AD rules
- add/edit role for a local user for a specific site
- add/edit role for a Windows AD group for a specific site
See status for online users
See the status of all users logged on to the Web user management and the ROB-EX Multiuser system.
The field “Status” in the left side of the window shows:
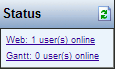
In the example 1 user is logged on to the Web user management and 0 users are logged on as ROB-EX clients (Gantt users).
Press one of the links to see details, e.g. see who is online on the ROB-EX Multiuser system and what time they logged in. If clicking on the “Gantt” link it is possible to send messages to a logged in ROB-EX client and as well it is possible to shut down a client, i.e. in order to perform maintenance of the system.
Pro, Light and Viewer
Users without administrator permissions have permission to change his/her own password.
The password is changed by selecting “My account” in the toolbar. The window “My account details” is opened:
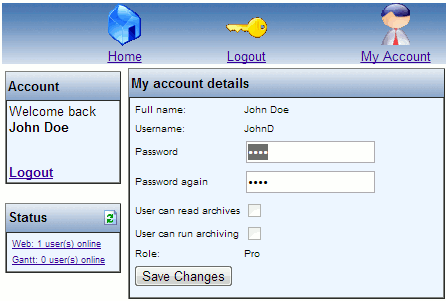
Change the password by entering a new password in the field “Password” and in “Password again”.
Save the changes by pressing the button “Save changes”.
Site configuration
As a user with administrator privileges you will have access to the Site configuration menu item.
Clicking the Site configuration menu item will display the following window:
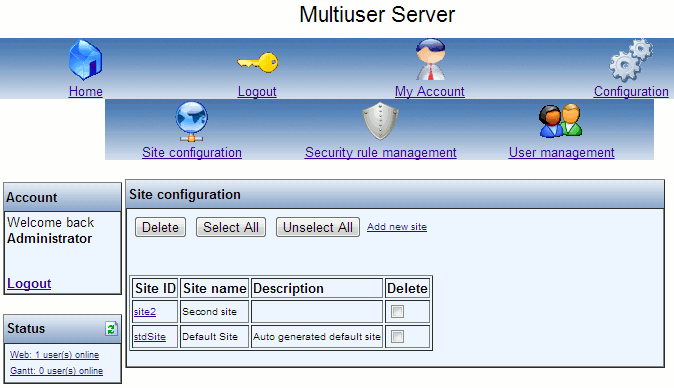
In the picture above it can be seen, that a second site has been added beside the auto generated default site.
A site will typically represent a distinct business entity. Sites neither share master or transactional data with each other, i.e. a client connected to site A cannot see any data belonging to site B.
The site concept allows multiple distinct business entities to share the same ROB-EX infrastructure (databases, software services, client program etc.) while still ensuring that each business entity lives isolated from each other.
When a ROB-EX client connects to the server, it must select what Site ID to connect to. A client can only be connected to one site at a time.
The same user can have different rights on different sites, i.e. a user can have Admin role in site A and have Viewer role in site B.
The Site configuration provides an overview of existing sites, as well as the possibility to add sites, edit sites and delete sites.
OBS: Deleting a site will cause all security rules, involving that site, to also get deleted.
How to add or edit a site
In this section we will describe how to add a new site and how to edit an existing.
To add a new site, first navigate to the Site configuration page.
From here you will have the option to add new site.
Clicking the Add new site link, will bring up the add site window:
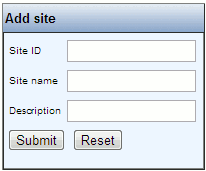
with the content as described below:
| Name | Type | Description |
| Site ID | Mandatory | A unique id for the site |
| Site name | Mandatory | A name for the site |
| Description | Optional | A description of the site |
To edit a site, simply click the site id.
A form containing the following the same fields as shown above will be shown. The id of the site cannot be edited, so if the id must be changed, it is only possible by first removing the old site and then add a new.
Adding and editing of local users
This section describes how local ROB-EX users are created and edited. A local user is a named user who only exists in the ROB-EX database – as opposed to a Windows Active Directory user who is created and managed through the windows AD environment.
If Windows Active directory is supported for the server hosting the ROB-EX Multiuser server, it is recommended to use AD groups for configuring access to the server, since it will be easier to maintain. If AD configuration is not possible, use the local users option. A local user may also be used for integration clients that run as a service.
In order to create or edit local users, press the “User management” button from the Configuration menu. The following window is shown:
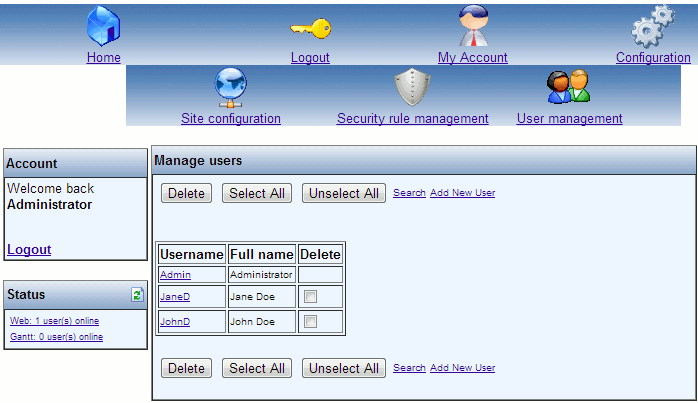
In this example, two user have been created, besides the administrator (users JaneD and JohnD).
Create a new local user
Press the link “Add new user” to create a new user. The following window is shown:
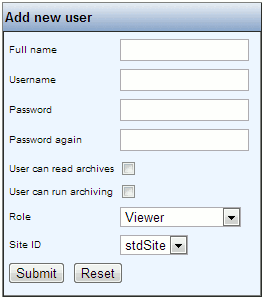
Enter
- the users full name,
- a username (e.g. initials) – this is the login name
- a password
Select
- if the user should be able to read archives
- if the user should be able to run archiving
- the role of the user.
- the site of the user (for information regarding sites, e.g. adding new sites, see Site configuration)
When the correct information has been entered, press the “Submit” button.
The username must be unique.
Adding a new user will automatically create a security rule for that user, providing access to the specified site. For further editing of the site access options for the user, see the chapter on Security rule management).
Edit a local user
In order to edit a local user, click on the username link of the user in the “Manage users” window. The window “Edit user details” is shown.
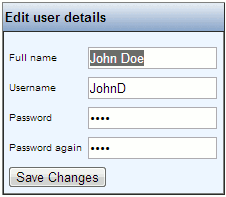
The following things can now be edited:
- The full name of the user
- The password of the user (e.g. initials)
Press the button “Save changes” in order to save the changes.
Security rule management
As a user with administrator privileges you will have access to the Security rule management menu item.
Through the security rule management display the following work flows can be executed
- add/edit role for a local user for a specific site
- add/edit role for a Windows AD group for a specific site
Clicking the Security rule management menu item will display the following window:
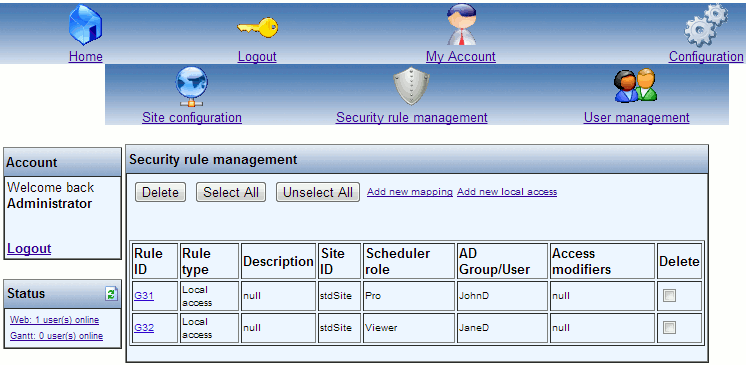
In the picture auto generated local access security rules have been created for the local users JohnD and JaneD.
The Security rule management provides an overview of existing security rules, as well as the possibility to add rules, edit rules and delete rules.
Security rule types
There are two types of security rules: AD mapping and Local access.
The Local access security rule type is used for local users.
This rule type allows the administrator to grant a role to a local user for a specific site.
When creating a new local user, a site and a role is selected, saving the user will then automatically create a local access security rule granting the user the selected role for the selected site.
If the administrator then wishes to grant the user a role to an additional site, a new local access security rule needs to be added, see How to add or edit a security rule. It is also an option to select the site option “All sites”, which will provide access to all sites for that user.
The AD mapping security rule is used for groups of users, Active Directory groups more specifically.
This rule type allows the administrator to grant a role for all members of an active directory group for a specific site.
If the administrator wishes to grant all members of an active directory group a certain role access for a site, an AD mapping security rule needs to be added, see How to add or edit a security rule.
How to add or edit a security rule
In this section we will describe how to add a new security rule and how to edit an existing.
To add a new security rule, first navigate to the Security rule management page.
From here you will have the option to either Add new mapping or Add new local access.
How to Add AD group mapping
Clicking the Add new mapping will display a form for adding a new AD mapping. The content of the form is explained below:
Name
Type
Description
Rule ID
Mandatory
A unique id for the rule
Rule type
Pre-defined
The type of the rule
Description
Optional
A description of the rule
Site ID
Mandatory
The id of the site this rule applies to. Select from the list of available sites. The option “All sites” will provide access for the AD group to all sites defined in the server
Scheduler role
Mandatory
The role members of the AD group will be assigned when they log in
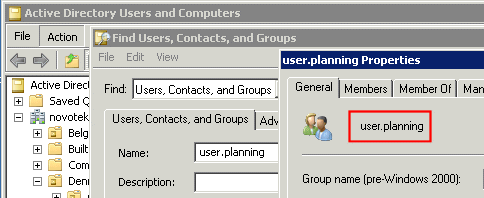
AD Group
Mandatory
The name of the active directory group this rule applies to. It is recommended to copy/paste the name from the “Active Directory Users and Computers” utility as shown in this picture (i.e. in this example “user.planning” would be copy/pasted into the AD Group field)
It is possible to define a domain for the group, this is done on the form \. If no domain is defined, the Multiuser will assume that the group is on the same domain as the server.
It is also possible to enter a specific user instead of a group name, i.e. this way providing access to a given site for a named AD user.
How to add local user mapping
Clicking the add new local access will display a form for adding a new local access. The content of the form is explained below:
| Name | Type | Description |
| Rule ID | Mandatory | A unique id for the rule |
| Rule type | Pre-defined | The type of the rule |
| Description | Optional | A description of the rule |
| Site ID | Mandatory | The id of the site this rule applies to |
| Scheduler role | Mandatory | The role of the user this rule applies to |
| User | Mandatory | The login name of the user this rule applies to |
To edit a security rule, simply click the rule id.
The id and the type of the rule cannot be edited. If any of these needs to be changed first delete the rule and add a new.
Data security
Data security ensure that limitations can be made on resources in the plan for users of the system running the multi user version. Configuration of these limitations is restricted only possible for the admin users.
As a use case assume that you have a production and a service line, each having two manpower resources: P1 & P2 and S1 & S2. The service people should only be able to modify their own resource and in case of overload move operations to the production resources (i.e. production personnel is a backup option for the service area in case of capacity problems).
To achieve this a role can be created with default access as deny for all assign and modify operations on resources. Open for modifications by adding an allow rule with assign rights on either P1, P2 or the production resource group. An extra rule for modify and assign on either S1, S2 or the service resource should be added if they are to manipulate their own resources.
Role to manage the data security:
| Id | Name | Description | Active Directory | Default access |
| G100 | Service role | DENY |
Rules assigned to selected role:
| Id | Name | Type | Rule type | Rule | Applied to |
| G48 | Move operations to roduction | RESOURCE | ALLOW | ASSIGN | P2,P1 |
| G49 | RESOURCE | ALLOW | MODIFY,ASSIGN | Service |
Note that the “Applied to” can be single resources or groups
Security Roles
Roles can be created to group rules for usage by either more users or active directory groups
- Id is just an auto generated identifier
- Name is the free to edit, so that the admin user can give the role a name. If entered the name is shown instead of the id
- Description is the free to edit, so that the admin user can enter a description or note for own purpose
- Active Directory should be entered if the role should be used by an active directory group
- Default access sets either all rights to ALLOW or DENY all tasks. Rules should be created to either enable or disable tasks
Rules are added to the selected role in the upper table. By default it sets the rule type to the opposite of the default access of the role
Id is just an auto generated identifier
Name is the free to edit, so that the admin user can give the rule a name. If entered the name is shown instead of the id
Type is what the rule is covering, at this moment it’s only resources
Rule type indicate if this rule is an ALLOW or DENY type
Rule is what this rule either allow or deny a user to do.
View is default allways possible
MODIFY is make modification
ASSIGN like assign operations to a resource
Note these can be combined
Applied to is what the rule applies to. It opens the resource filter dialog from which resources can be selected
User assignments
This section joins the users together with roles and rules. The left table shows the normal users with an Active checkbox. If an user are to use the data security this checkbox should be marked. Active directory users are activated by adding them to the correct active directory group in the Windows user management.
Once selected, an user can get a role assigned by using the dropdown placed upper right to the user table. Additionally rules can be added to this user by pressing Add rule.
Affected functionally
The following parts of ROB-EX Scheduler Client are affected by data security
- All operations assigned to a non-editable resource are locked
- The right click menu on non-editable operations has a limited list of options available
- The edit operation dialog is restricted to read only for non-editable operations
- Delete of operations is disabled for non-editable operations
- You cannot assign operations to resources where you do not have edit rights
- The detail panel with project, order and operation detail is restricted
- In the order list only orders with operations that have full modify and assign rights are editable for status and delete actions
- In edit order those non-editable operations have all fields as read-only in the operations table
- In edit order change of route is only possible if the user has full modify and assign rights on all operations of the route (or the route is empty)
- In edit routes only operations that have assign to rights may be added to the route. Non-editable operations have their fields as read-only in the operations table
- We allow the creation of sub-order links between operations, as long as a user has modify permission on just one of the selected operations.
Event Storage
Multiuser has a mode that makes it possible to enable tracking of events, or logging of actions, on operations. Events are tracked to a separate database table, as explained below.
By default the event storage is turned off. To enable this feature change the event.storage property in the scheduler-server.properties file.
The file is located in the ganttServer\server\gantt\conf\ folder, if not, it should be create with this content:
/* use event storage for persisting events */
event.storage=true
The server should be restarted before logging will take place. Note that only changes made after the enabling will be present in the event storage, no prior data is logged in the system.
This first version of the event storage only log operation data into the database and the only interface for viewing the event data is through SQL queries.
Events of the progress and quantity for operations can be found using the progressQuantityEvents view that is placed in the ganttServer\server\gantt\conf\sql.init\eventStorage_progressQuantityEvents.sql_ file. Rename the file to end with .sql (remove the _ from the filename) and restart the server to create the view.
This example show the usage of the view:
select * from progressQuantityEvents;
| siteId | productionOrderName | productionOrderId | productName | productId | operationName | operationId | progressDateTime | progressQuantity | quantity | progressSetup | initiator |
| stdSite | G17 (3) | G14 | NULL | G14 | Cut2AC 22 | G49 | 2014-04-06 18:30:00.000 | 0,3 | 1 | 1 | Admin |
New fields introduced here are:
- progressDateTime, which is the date time of the reported progress
- initiator is the ROB-EX user who initiated the event. Note that the initiator in Shop Floor is the user running the Shop Floor server. It is not the Shop Floor user!
Fields ending with “Name” are editable from within the ROB-EX configuration.
The fields that ends with “Id” are database key, which can be used to further lookup information about an object. This is an example of how to use the progressQuantityEvents view together with the operation table to retrieve more information (doing an inner join):
 select p.siteId
          ,productionOrderName
          ,productionOrderId
          ,productName
          ,productId
          ,operationName
          ,operationId
          ,progressDateTime
          ,p.progressQuantity
          ,p.quantity
          ,p.progressSetup
          ,initiator
          ,CustomText1
from progressQuantityEvents as p inner join EOperation as o on p.siteId = o.siteId and p.operationId = o.Id;| siteId | productionOrderName | productionOrderId | productName | productId | operationName | operationId | progressDateTime | progressQuantity | quantity | progressSetup | initiator | CustomText1 |
| stdSite | G17 (3) | G14 | NULL | G14 | Cut2AC 22 | G49 | 2014-04-06 18:30:00.000 | 0,3 | 1 | 1 | Admin | Operation number 1 |
| stdSite | G17 (3) | G14 | NULL | G14 | Cut2AC 21 | G50 | 2014-04-02 07:00:00.000 | 0 | 1 | 0 | Admin | Operation number 2 |
Multiuser terminology section
Login Roles
Users can be assigned different login roles. A login role defines the permissions of a single user. The following login roles are available.
Viewer
The ROB-EX Viewer user have permissions to see the plan.
Does not have permissions to change the plan or edit other users.
Light
The ROB-EX Light user have permissions to edit the plan.
Does not have permissions to edit other users.
Have less permissions than the Pro user.
Pro
The ROB-EX Pro user have permissions to edit the plan.
Does not have permissions to edit other users.
Admin
The ROB-EX Admin user have permissions to edit the plan and edit other users.
Post your comment on this topic.