
Installation and Administration guide
Table of contents
- Preparation
- Installation of ROB-EX Multiuser Server
- Updating an existing ROB-EX Multiuser Server
- Starting up ROB-EX Multiuser Server and Clients
- Stopping ROB-EX Multiuser Server
- 64-bit NT Service
- Connect to a remote database
- Install a second Multiuser database
- Clear/wipe existing Multiuser database
- Running on OpenJDK Java Version
- Install Microsoft SQL Server Express Edition
- Trouble shooting guide
- Backup of ROB-EX Multiuser Server database
- Custom changes to ROB-EX Multiuser Server
This document explains the procedures to follow when installing or updating ROB-EX Multiuser Server.
Preparation
SQL Server already available
If you do not have an existing SQL server to connect to we recommend that you start out installing the MS SQL Express edition before installing the ROB-EX Multiuser Server. As an example of what to install and configure, please read the chapter Install Microsoft SQL Server Express Edition.
Make sure that the SQL Server you are connecting to is using Mixed Mode Authentication. You can inspect and change this setting from within SQL Management Studio. Right click on Database Server select Properties->Security->Server Authentication.
If you have a possible existing GanttMultiuser database take a backup of this database before you start the installation (see Backup of ROB-EX Multiuser Server database). For a new installation of Gantt Multiuser Server also have an SA account handy, since this will be required during the installation.
How to check the version number of the current Sql server
In a Dos prompt write:
osql -E -Q"SELECT @@VERSION"Read the version number. See the requirements section to learn more about supported SQL Server versions. Both 32 and 64-bit version of MS SQL are supported.
To leave osql, write: “exit”.
Required version of JAVA JDK
The ROB-EX Multiuser server requires as a minimum Java Development Kit (JDK) 1.5. However a 64-bit JDK 1.8 is recommended. The JDK must be installed manually prior to running the installer SetupROB-EXServer.exe.
You can check if a JDK is already installed by running the command “javac” in a command prompt. If the command is not found you may still have a JDK installed, but without it being on the command search path. You can manually check for an installations in c:\program files\java
ROB-EX Multiuser Server will use the JDK pointed to by the JAVA_HOME environment variable. To verify if the environment variable exists select properties for “My computer”. Select the “Advanced” tab and click the button “Environment variables”. In the section with “System variables” check if the entry JAVA_HOME exists and holds a correct values (e.g. c:\jdk1.6.0 pointing to the root of the jdk installation directory.
If you need to install a JDK, see Running on OpenJDK Java Version
Also see the trouble shooting section to read more about the JAVA_HOME environment variable.
Installation of ROB-EX Multiuser Server
ROB-EX Multiuser Server is installed by running the setup program SetupROB-EXServer.exe.
Please read the preparation section before starting the installation.
The installer handles the installation of common multiuser server files and folders (ROB-EX Server Essentials) and up to 4 individual server instances (ROB-EX Server Instance 1-4).
The installer displays a main window where instances can be installed, updated or removed.
When installing an instance for the first time ROB-EX Server Essentials is installed prior to the instance installation. The folder of ROB-EX Server Essentials determines the subsequent placement of all server instances!
ROB-EX Server Essentials Installation:
NOTE: ROB-EX Server Essentials will be installed/updated automatically when a server instance is installed/updated
Install steps:
- Checking prerequisites: The installer will run a series of checks before starting installation. If any of the checks fails the installation is aborted with a message!:
- Java Check: Check the java-version on the machine.
- Welcome-screen: press next
- License agreement: Read carefully before accepting!
- Customer information: Input username and organization.
- Setup-type:
- Complete: Install ROB-EX Server Essentials and all instances under C:\Program Files\…
- Custom: Choose where to install ROB-EX Server Essentials and instances. Important: you must install to a fixed hard drive, i.e. “c:\program files” since Windows will otherwise not allow the server to be started as a NT Service. As an example you should not install to the directory “f:\robex” if the f: drive is a network mapped drive.
- Ready to Install the Program: If satisfied with the installation-setup press “Install”.
After installing the Server Essentials the installer continues with installing/updating the instance.
ROB-EX Server Instance Installation:
Install Steps:
- Checking prerequisites: The installer will run a series of checks before starting installation. If any of the checks fails the installation is aborted with a message!:
- Common Server Check: Is the installed Server Essentials the same version as the Server Instance about to be installed?
- Java Check: Check the java-version on the machine.
- Welcome-screen: press next
- License agreement: Read carefully before accepting!
- Customer information: Input username and organization.
- Database Server: Select the desired database to install to.
- Browse to the desired database server instance or input manually (\)
- Input server port. Important: the server port must be valid for the server instance to startup after installation! See Install Microsoft SQL Server Express Edition on how to enable TCP/IP ports on your sqlserver.
- Choose authentication method, either use windows authentication or username/password authentication. The authentication details are only used to create the database and a user with the right privileges, after the install the newly created user is used to start the multiuser service.
- Name of database: The database is created if it does not exist or updated otherwise. Leave as is for standard installation or specify for specific database name.
- Press next and the database information is validated. Important: The installation will not continue if it could not connect to the database.
- Setup-type: Choose Custom to see where the instance is to be installed. NOTE: The install directory is determined by the install directory of “ROB-EX Server Essentials”!
- Ready to Install the Program: If satisfied with the installation-setup press “Install”.
Important: The instance is added as a Windows Service and will not start automatically until the PC is rebooted. To start the service without rebooting the PC use “Start->Run->services.msc”. Locate the “ROB-EX Server Instance #” service and start the service using the menu item “Actions->start”. Also see Starting up ROB-EX Multiuser Server and Clients.
A link to administrate the instance is placed in the start menu. Click this link to test is the server instance is running, otherwise see Starting up ROB-EX Multiuser Server and Clients
If after installation you have problems running the Multiuser Server please consult the Trouble Shooting Guide
Multi user security
For more on using secure networking communication in the server installation, please read Secure networking communication – SSL, Multi user
Updating an existing ROB-EX Multiuser Server
The version number is available in the bottom part of the server administration web-page (localhost:8080/gantt). Also read the section Test that Multiuser server is running.
If updating a 4.1 version or newer simply follow these steps:
- Disconnect all running clients to the server
- Start the installer SetupROB-EXServer.exe
- Choose the instance to update in the list of instances installed on the computer and press “Update”.
- The update process does the following:
- Reads the configuration of the installed instance.
- Stops the service if started.
- Updates all files.
- Updates the database.
- Starts the service again.
Non-standard database login
The standard database login name for the GanttMultiuser database is “ganttAdmin”. If another database login is being used or if the “ganttAdmin” login is not using the standard password it will be necessary to carry out the following manual post configuration steps after completion of installing “SetupROB-EXServer.exe”. The “OldServerUninstall.exe” tool will warn you on the install complete page, if it is necessary to carry out these steps:
- Find and open in a text editor the backup copy of “c:\program files\ganttServer_Backup\server\gantt\deploy\mssql-ds.xml”. Search for the following area (“MSSQLDS” as the jndi-name) and copy/past the text in yellow
![]()

- Paste the user-name and password in the equivalent file and location in the new install area:
c:\program files\ganttServer_Backup\server\gantt\deploy\mssql-ds.xml
Non-standard web-service ports
By default the ROB-EX Server uses port 8080 as the main service port, also see the section on Changing service ports”. The “OldServerUninstall.exe” tool will warn you if it is necessary to manually reconfigure service ports, as explained in the Changing service ports” section.
Starting up ROB-EX Multiuser Server and Clients
The ROB-EX Multiuser Server is automatically started as a NT service. This ensure that the server program is automatically started in the event that the server PC is rebooted.
Controlling the NT service
Open the Windows Services program (Windows+R->services.msc). Locate the “ROB-EX Server Instance #” service and start the service using the menu item “Actions->start”
In case of problems running the service consult the trouble shooting section
Start manually (console mode)
Note: if the service display name has x86 or x64 as postfix – read how to operate the 64-bit service.
Important: the NT service must be stopped before starting in console mode!
- open the folder:
<dir>\ganttServer\server\gantt\service\ - double click the file “startInConsole.bat
- A console pops up and the server starts.
Note: The startup process may take app. 15-60 seconds. “ROB-EX Server Instance #” is fully started when the black console screen reads “JBoss (MX Microkernel ) started in XXs:XXms”.
Test that Multiuser server is running
- Test the installation by opening the following URL in a web browser: localhost:8080/gantt” (this tests the first instance, to test other instances go to the start menu, browse to ROB-EX and choose the link to the instance you want to test)
This will start the ROB-EX Multiuser Server web-client interface allowing you to administrate users. The very first time you access the web-interface it may take app. 1-2 minutes before the browser has loaded the startup page, since files needs to be compiled on the server.
Important note: the web-browser must support cookies, otherwise you will experience that you can log in but not go to any of the sub-pages. Make sure that cookie support is enabled (Internet Explorer security settings).
- Login with user “Admin” and password “Admin”. Possible change the password of the Admin user or create new users.
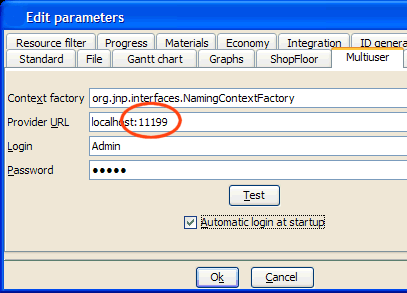
- Each individual ROB-EX Multiuser client must be setup using the menu Functions->Settings->General and the tab “Multiuser”.
Enter the following values:
Provider URL: :11099 ( must be replaced by the host name of the PC running the server application. Port 11099 belongs to instance 1, instance 2 port is 11199, instance 3 is 11299 and instance 4 is 11399)
Login: Admin (or another user created in step 2)
Password: Admin (or another password created in step 2)
Stopping the ROB-EX Multiuser Server
Depending on how the server was started two different ways of stopping the server exists
- If the server is started as a Windows NT service, then it must be stopped from the Windows services window (Run->services.msc)
- If the server is started in console mode for a logged in user, then locate the ROB-EX Multiuser console window and close the window normally (press the closing cross in upper right corner of the console window) – wait app. 1 minute until the server has been shut down completely (the console window disappears).
64-bit NT Service
Placed inside the ganttServer\server\gantt\service64 folder an installation script can be found that make it possible to run the scheduler server as a service using both 32-bit and 64-bit versions of the java JDK. Main reason for using the 64-bit version is memory usage working with large scheduling plans – but in general it has better performance characteristics than the 32-bit version, so it is recommended to use the 64-bit service.
Note: from ROB-EX 5.2 this service is replacing the older Wrapper.exe based service. A possible existing 32-bit service based on Wrapper.exe, should be stopped and set to disabled before installing and starting the 64-bit version.
A 64-bit java JDK should be installed on the system and the JAVA_HOME environment variable should be updated to point to it (change it from Computer->Properties->Advanced system settings->Environment variables->System variables).
The install script, installSchedulerServerService.bat, takes the following input parameters (if no parameters are specified, first parameter defaults to “install”):
- install [number]: this will install a new service for ROB-EX instance [number]
- uninstall [number]: this will uninstall an existing service for ROB-EX instance [number]
- start [number]: this will start the service for ROB-EX instance [number]
- stop [number]: this will stop the service for ROB-EX instance [number]
- run [number]: this will run the service for ROB-EX instance [number] in console mode (make sure the NT service is stopped)
Memory settings are placed in the install script. If changes are needed one can uninstall the service and update the default values and reinstall:
- XMS=1024 is the min memory.
- XMX=2048 is the max memory allowed.
The service should be restarted before changes are used.
Note that if no parameters are given, the script will install a service called SchedulerServer. Also note that new versions of the scheduler overwrites the files placed in the service64 folder.
 |
|
|
For advanced users it is also possible to modify parameters of the service without re-installing it. This is done using Regedit.exe searching for the nodes HKEY-LOCAL-MACHINE\SOFTWARE\Wow6432Node\Apache Software Foundation\Procrun 2.0\<instance>\Parameters.As an example the memory max setting may be changed in attribute “Java->JvmMx”. |
|
Note it is supported to run 32-bit Java on one instance and 64-bit on another instance. However this requires that all server instances are converted into using the new service type, i.e. do not mixing old Wrapper.exe based services with the new service between instances. |
Updating of already installed database
On sub-sequent updates of ROB-EX Multiuser server the database is automatically updated.
If something went wrong during the install you might need to update the server manually. To do this you must manually run the script
ganttServer\server\gantt\install\update\ms-sql-db-update.sqlOn the database
Important: If the GanttMultiuser database was not updated properly it could result in errors when starting up the ROB-EX Multiuser Server service, inspect the log-file to look for problems, see Trouble Shooting section.
Install a second Multiuser Instance
If you would like to run a second Multiuser instance, this chapter will explain the steps to follow in order to install a second Multiuser server instance.
Installing a new instance is done the same way as installing the first instance( See Installing ROB-EX Server Instance) In the main window choose “Install New Instance” and the next free instance is installed on the computer.
The installation automatically starts the new instance and places a link to the administration interface in the start menu.
Setup the client to connect to the new instance
To connect to different server instances from a ROB-EX Client the following ports must be used:
- Instance 1: default port 11099
- Instance 2: default port 11199
- Instance 3: default port 11299
- Instance 4: default port 11399
A maximum of four instances can be installed per machine.
To connect to the second instance can be done as follows in the client:
Clear/wipe existing multiuser database
To clear an existing Multiuser database you will need to manually run the script
ganttServer\server\gantt\install\sql\allclean.sqlon the database you want to clear. Afterwards you need to restart the Multiuser service
Running on OpenJDK Java Version
This paragraph explains how to configure the ROB-EX Multiuser Server to run on an Adopt OpenJDK. As of January 2019 the Oracle JDK is no longer free to use. The suggested alternative is to use the Adopt OpenJDK version 8. Follow these steps to achieve this
- Download the correct Adopt OpenJDK version 8 JDK for your operating system, for ex. Windows X64
- For easy installation, select the MSI installer version. During install enable the “Set JAVA_HOME variable” option.
- If you select to download as an archive (e.g. zip), then
- Extract the archive into a folder, e.g.
c:\program files (x86)\ROB-EX\adoptOpenJdk. You will now, among other, have a folder calledc:\program files (x86)\ROB-EX\adoptOpenJdk\bin - Set the JAVA_HOME environment variable to the extracted folder path
c:\program files (x86)\ROB-EX\adoptOpenJdk(read the Trouble Shooting Guide for how to change this environment variable)
- Extract the archive into a folder, e.g.
For a new ROB-EX Multiuser Server installation
- Carry out the above steps prior to runing the ROB-EX Multiuser Server Installer.
- The installer will automatically pick up the JDK from the JAVA_HOME environment variable.
For an already installed ROB-EX Multiuser Server installation
- Carry out the above installation steps.
- Edit existing or additional settings using the Windows Regedit tool (Run->Regedit.exe). Note this is an advanced editing tool – only proceed if you know what you are doing.
- Search for the node
HKEY_LOCAL_MACHINE\SOFTWARE\Wow6432Node\Apache Software Foundation\Procrun 2.0\RobexServerInstance<instance>x64\Parameters. - Edit the node Java->Jvm. Replace the the old JDK path e.g.
c:\program files\java\jdk1.8.0_151with the extracted folder path of the OpenJDK, e.g.c:\program files (x86)\ROB-EX\adoptOpenJdk - Edit the node Java->Classpath. Replace the the old JDK path e.g.
c:\program files\java\jdk1.8.0_151with the extracted folder path of the OpenJDK, e.g.c:\program files (x86)\ROB-EX\adoptOpenJdk - Close Regedit and restart ROB-EX Multiuser Server Instance service
Installation of Microsoft SQL Server Express Edition
This is a step by step example of installing the SQL 2005 Express Edition. Intalling a more recent versions is of cause recommended, so see this is a guide to the installation steps required. Note that the SQL Express edition has limiations. They may change over time, but typically the limitations are:
- Utilizes only 1 CPU (even though the server has more installed)
- 1 GB Addressable RAM
- 4 GB Maximum Database Size
For a small to midsize ROB-EX Multiuser Server (single site up to app. 100 resources and 5000 active productions orders) this will usually never be a limitation. For larger installations the limitation of 1 CPU may give performance problems on heavy loads.
Installation procedure
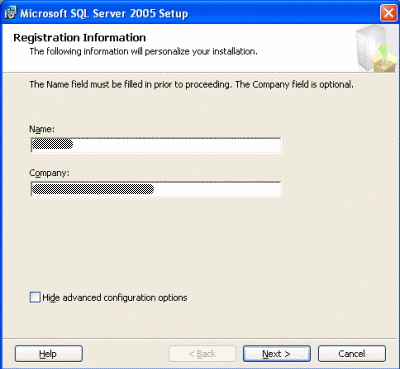
- Download and install “SQL Server 2005 Express Edition with Advanced Services SP3”. Reporting services are not required by ROB-EX, so alternatively the two separate downloads for “Microsoft SQL Server 2005 Express Edition” and “SQL Server Management Studio Express” can also be installed
- Run the installer and accept to install possible prerequisite programs
- When entering “Registration information” remove check mark in “Hide advanced configuration options”
![]()
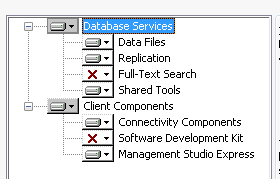
- Select to install the following components:
![]()
- When asked to select instance name you should select “Default instance” if you are sure that an existing SQL Server is not already installed on the PC. If an existing SQL server is already installed select “SQLExpress” as the instance name (will however require some manual configuration of ROB-EX Multiuser Server, see Connect to a remote database)
![]()

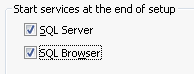
- Specify that both SQL server and Browser should be started at the end of setup:
![]()
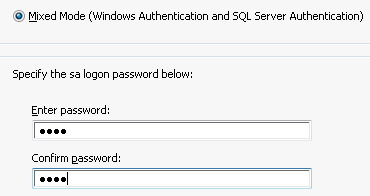
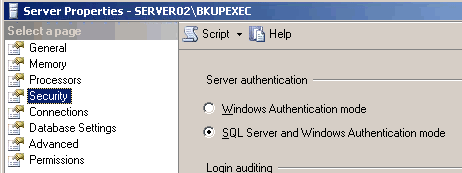
- Select “Mixed Mode” Authentication mode and enter a password for the “sa” logon
![]()
- Select default settings for the remaining steps and complete the installation.
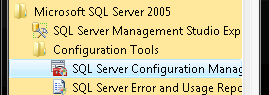
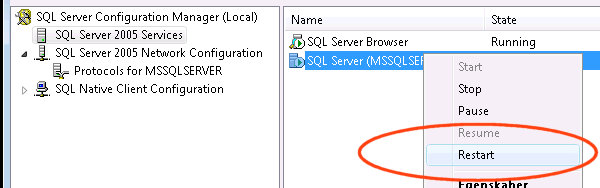
- After completed installation run the “SQL Server Configuration Manager” from the start menu
![]()
And select the properties for TCP/IP in the Network Configuration
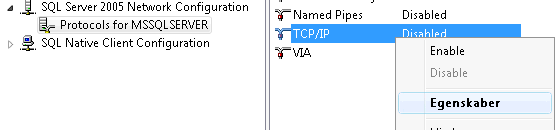
Enable TCP/IP in the Protocol tab
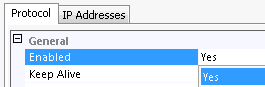
Optionally change the default port 1433 in “IP Addresses” tab. You should only change from 1433 if you experience problems with the default port number.
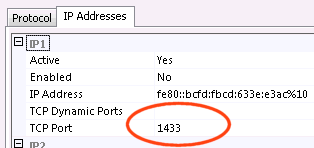
After pressing OK you will need to restart the SQL Server service from the Configuration Manager
- You can test the installation by opening up a Windows command prompt (start->Run->cmd.exe) and enter
![]()
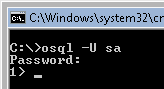
As password specify the password entered in step 6 above. If you are able to successfully login enter exit to leave the OSQL console. If you are not able to login check the Windows event viewer for possible explanations of the problems. Also check Microsoft SQL 2005 homepage for further trouble shooting.
Trouble Shooting Guide
This chapter explains a number of steps to verify in case of problems starting the Multiuser Server
To search for the root of a problem you should start out p(#server-log-file). consulting the ROB-EX Multiuser Server log file. This file is located in the directory
ganttServer\server\gantt\log\server.log
You should look from the top of the log file and forward, until you see the first error message.
Ensure that the J2SE JDK1.5 or newer. has been correctly installed. Also make sure the environment variable JAVA_HOME exists and contains a valid directory path to the location of the Java development kit. To verify if the environment variable exists select properties for “My computer”. Select the “Advanced” tab and click the button “Environment variables”. In the section with “System variables” check if the entry JAVA_HOME exists and holds a correct values (e.g. “c:\jdk1.6.0” pointing to the root of the jdk installation directory).
Check the JAVA_HOME environment variable
Check also if the JAVA_HOME system environment variable is set. This can be done either by selecting properties on the “My computer” icon and in the Advanced tab select “Environment variables”. Alternatively you can check it by entering the command “set JAVA_HOME” in the command line window (cmd.exe).
If the JAVA_HOME environment variable is set to point to another version of Java Development Kit than the one used to run ROB-EX, the JAVA_HOME environment variable must be hard-coded in the Multiuser server’s run file: Edit the file “….\ganttServer\bin\run.bat”.
Add the line: set JAVA_HOME=<path> in the top of the file,
<path> is the path to Java Development Kit, e.g.: “C:\Program Files\jdk1.8.0_XX”.
The server.log file (see above) may contain a database error entry of the type: “Login failed for user ‘username’. The user is not associated with a trusted SQL Server connection”. This error means that the SQL server has been configured to operate in “Windows Authentication Mode” and doesn’t allow the use of SQL accounts.
The resolution is: In security properties of the database, Change the Authentication Mode of the SQL server from “Windows Authentication Mode (Windows Authentication)” to “Mixed Mode (SQL Server and Windows Authentication mode)”.
If getting an error similar to “wrapper unable to bind listener port 0 … an attempt was made to access …” when trying to start the Multiuser service, try uncommenting the following line in file “ganttServer\server\gantt\service\multiuserService.conf”:
#wrapper.port=15000
Next try to restart the Multiuser service again. Possibly select a different portnumber if the specified port also causes problems.
If a client gets the following error trying to log in: java.lang.OutOfMemoryError: Java heap space the ROB-EX Multiuser server/service does not have enough memory available. To increase the amount of memory available do the following
1. Stop ROB-EX Multiuser server
2. Edit the text file <robex_server_installdir>\ganttServer\server\gantt\service\multiuserService.conf
Search/find line reading:
wrapper.java.maxmemory=512
3. Increase the max amount of memory available to the service, e.g.
wrapper.java.maxmemory=800
Save the text file.
4. Restart the ROB-EX Multiuser server
Make sure the GanttMultiuser database has been created in the MS SQL Server or MSDE going to be used by ROB-EX Multiuser. This can be checked using the osql.exe utility shipped with MS SQL Server or the MSDE (if the MSDE has been correctly installed the osql utility will be available on the path). The following command sequence shows the expected command sequence. If the following command sequence fails the database either does not exist or the user ganttAdmin has no access rights to the database.
osql.exe -U ganttAdmin -d GanttMultiuser
Password:
1> exit
9. There is a known problem running the Multiuser Server on Windows PC’s where the turkish language locale has been selected. A work around of this problem is to start the Multiuser Server with english language locale. To do this two files must be edited with e.g. notepad or another text editor
File 1: ganttServer\bin\run.bat – lines added are in bold
set JAVA_OPTS=%JAVA_OPTS% -Xms128m -Xmx512m

rem Select other language/country than default computer setting.
rem Neccessary for Turkish locales tr_TR !
set JAVA_OPTS=%JAVA_OPTS% -Duser.language=en -Duser.country=US

rem JPDA options. Uncomment and modify as appropriate to enable remote debugging.
File 2: ganttServer\server\gantt\service\multiuserService.conf – lines added are in bold
# Java Additional Parameters
wrapper.java.additional.1=-Dprogram.name=run.bat
# Uncomment the following line when running with Turkish locales tr_TR !
wrapper.java.additional.2=-Duser.language=en -Duser.country=US
There is a known conflict with Microsoft Office Servers Load Balancer using port 8093 which is also by ROB-EX Multiuser Server. If you encounter this problem your ROB-EX clients will show and error saying they were unable to login to the Multiuser server. Inspecting the log-file of the client will reveal the following cryptic error (invalid stream header):
J2EEPlugin: Multiuser event listener .....
org.jboss.mq.SpyJMSException: Cannot authenticate user; - nested throwable: (java.io.StreamCorruptedException: invalid stream header: 48545450)
at org.jboss.mq.Connection.authenticate(Connection.java:1161)
at org.jboss.mq.Connection.<init>(Connection.java:248)
(...)
The fix is to select a different port than 8093 for ROB-EX Multiuser MQ service as explained below (also see the section Changing service ports). Edit the file ganttServer\conf\gantt-bindings.xml and locate the “ports-0X” part (X is the instance no. of your server). Navigate to the part reading
<service-config name="jboss.mq:service=InvocationLayer,type=UIL2" delegateClass="org.jboss.services.binding.AttributeMappingDelegate">
  <delegate-config portName="ServerBindPort"/>
  <binding port="8093"/>
</service-config>
and change the binding port value to a different value (e.g. 8593).
10. There is a known problem with the Multiuser web-administration client and Internet Explorer, when the Multiuser Server is running on a host that has an underscore ‘_’ as part of the server name (e.g. ‘02_ss02’).
The problem is that the web-client reports errors about the user not being logged in, since session cookies not are allowed, also see http://support.microsoft.com/kb/325192
_Cookies on ASP pages are blocked if the server name contains characters that are not supported by Domain Name System (DNS).
For example, you cannot use underscore characters () in the server name. This behavior is by design.
If this a problem use the ip-address of the server rather than the server name, e.g. http://10.100.43.23:8080/gantt . Also you can on the server use the address http://localhost:8080/gantt
In case the SQL Server instance is restarted without restart of the Multiuser Server service and the Multiuser does not automatically reconnect to the database then errors of the following type may be found in the server log file: <dir>\ganttServer\server\gantt\server.log
java.sql.SQLException: Invalid state, the Connection object is closed.
or
java.sql.SQLException: Network error IOException: Connection timed out: connect
The immediate fix to this problem is to restart the Multiuser service. The long-term fix is to ensure that the Multiuser service will automatically maintain the connection and automatically reconnect to the database server. To enable automatic reconnect edit the file <dir>\ganttServer\server\gantt\deploy\mssql-ds.xml in e.g. Notepad and navigate to the <jndi-name>MSSQLDS</jndi-name> part and add the parts marked in red in the following description:
<!-- Add the socketTimeout and socketKeepAlive parameters in red below to the connection-url -->
    <connection-url>jdbc:jtds:sqlserver://localhost:1433/GanttMultiuser;instance=;useCursors=true;socketTimeout=60;socketKeepAlive=true</connection-url>
    <driver-class>net.sourceforge.jtds.jdbc.Driver</driver-class>
    <user-name>ganttAdmin</user-name>
    <password>ganttAdmin</password>

    <!-- Copy and paste from here down to and including check-valid-connection-sql -->
    <min-pool-size>1</min-pool-size>
    <max-pool-size>10</max-pool-size>
    <!-- the length of time to wait for a connection to become available when all the connections -->
    <!-- are checked out.  Default is 30000 (30 seconds). -->
    <blocking-timeout-millis>30000</blocking-timeout-millis>
    <!-- indicates the maximum time a connection may be idle before being closed. -->
    <!-- Setting to 0 disables it.  Default is 15 minutes. -->
    <idle-timeout-minutes>5</idle-timeout-minutes>
    <!-- an sql statement that is executed before it is checked out from the pool to make sure -->
    <!-- it is still valid. If the sql fails, the connection is closed and new ones created -->
    <check-valid-connection-sql>select getdate()</check-valid-connection-sql>
and restart the Multiuser service.
There is a known problem regarding ROB-EX Scheduler deploys with many planners working simultaneously alongside an integration client asynchronously importing from an external ERP systems. Deadlocks may occur, resulting in messages in the server.log file like these
Transaction (Process ID 65) was *deadlocked on lock | communication buffer resources with another process and has been chosen as the deadlock victim. Rerun the transaction.
  *
Transaction (Process ID 72) was *deadlocked on lock resources with another process and has been chosen as the deadlock victim. Rerun the transaction.*
Deadlocks will slow down the performance and may also in rare situations lead to new orders being created with incomplete data.
The root cause of the deadlocks is in the above cases the SQL Server. The fix is to enable Snapshot Transaction Isolation (which enable row locking as opposed to table locking) on the SQL Server database and then instruct the ROB-EX Scheduler Multiuser Server to use this transaction isolation level. The draw backs of this approach is a minor increase in resource utilization on the SQL server (storage space and CPU), but for normal ROB-EX Scheduler usage this increase is irrelevant compared to the gain it gives.
To enable Snapshot Transaction Isolation the following two steps must be carried out.
Step 1:
Run this command from SQL Server Management Studio to enable support for Snapshot Transaction Isolation.
ALTER DATABASE GanttMultiuser SET ALLOW_SNAPSHOT_ISOLATION ONStep 2:
Stop the Multiuser Server service.
Edit with text editor file: C:\Program Files\ROB-EX\ganttServer\server\gantt\deploy\mssql-ds.xml
Adding the new-connection-sql line in yellow as shown below
<?xml version="1.0" encoding="UTF-8"?>
<datasources>
<!-- jTDS MS SQL 2000 and 2005 driver -->
<local-tx-datasource>
<jndi-name>MSSQLDS</jndi-name>
...
<new-connection-sql>SET TRANSACTION ISOLATION LEVEL SNAPSHOT;</new-connection-sql>
</local-tx-datasource>
</datasources>

_Trouble shooting config_
_
1. If the Alter Database command has not been executed then server.log will contain this error:

@javax.security.auth.login.LoginException: java.sql.SQLException: Snapshot isolation transaction failed accessing database 'GanttMultiuser' because snapshot isolation is not allowed in this database. Use ALTER DATABASE to allow snapshot isolation.@
Backup of ROB-EX Multiuser Server database
If you have SQL Server Management Studio installed we recommend that you use it for creating database backups (right click on database and select Tasks->Backup). The explanation below can be used in case you use SQL MSDE without any management options available.
To create a database backup
Execute the BACKUP DATABASE statement to create the database backup, specifying:
The name of the database to back up.
The backup device where the database backup will be written. To backup to a disk file a logical backup device needs to be created.
Optionally, specify:
The INIT clause to overwrite the backup media, and write the backup as the first file on the backup media. If no existing media header exists, one is automatically written.
The SKIP and INIT clauses to overwrite the backup media even if there are either backups on the backup media that have not yet expired, or the media name does not match the name on the backup media.
The FORMAT clause when using media for the first time to completely initialize the backup media and rewrite any existing media header.
The INIT clause is not required if the FORMAT clause is specified.
Important Use extreme caution when using the FORMAT or INIT clauses of the BACKUP statement, as this will destroy any backups previously stored on the backup media.
Example
This example backs up the entire GanttMultiuser database to a disk file:
osql.exe -U ganttAdmin -P -Q
  "BACKUP DATABASE GanttMultiuser TO DISK = 'c:\temp\GanttMultiuser_1.dat' WITH INIT"
The above line assumes no password is needed for the user ganttAdmin. The above line can be executed from the Windows scheduling utility e.g. every night. It is then important that the file 2 c:\temp\GanttMultiuser.dat is backed up by the normal backup procedure.
To restore a database backup
Important The system administrator restoring the database backup must be the only person currently using the database to be restored. If this is not the case see below for a solution.
To restore the database from the file c:\temp\GanttMultiuser.dat” execute the following command:
osql.exe -U ganttAdmin -P -Q "RESTORE DATABASE GanttMultiuser FROM DISK = 'c:\temp\GanttMultiuser_1.dat'"
The above line assumes no password is needed for the user ganttAdmin
The restore may in some cases fail if unable to gain exclusive access to the database. This happens if another user is already connected to the database. If this happens one way to solve the problem is by first killing all connected users, next put the database in single user mode (to avoid new users to re-connect). Do the restore and finally put the database back in multi user mode again
/* To get list of connected users */
select spid from master..sysprocesses where dbid = db_id('GanttERP') and spid <> @@spid
go

/* Now kill the user - example id's returned from above statement should be used */
KILL 54
go

/* Next put database in single user mode */
ALTER DATABASE GanttMultiuser SET SINGLE_USER WITH NO_WAIT
go

/* Now do the restore .....*/

/* Finally put the database back in Multi User mode */
ALTER DATABASE GanttMultiuser SET MULTI_USER WITH NO_WAIT
go
Shrinking transaction log file
This paragraph explains how to shrink the transaction log file if it is getting too big. Early versions of ROB-EX Multiuser database installed the GanttMultiuser database with the “Full” recovery model of SQL Server, which will tell SQL Server to create transaction log files. If the transaction log is not being backed up and shrunk, it may eventually end up filling up the entire disk space.
New version of ROB-EX Multiuser database is installed using the “Simple” recovery model, which is not using transaction log files. Below is explained how to shrink a transaction file being too large and subsequently changing to use the “Simple” recovery model in the future.
First you must stop ROB-EX Multiuser Server to ensure that not clients are connected to the database.
Next start the osql utility by selecting “Start/Run…” and enter the command “osql -U sa”
Enter the sa password (typically empty) and then enter the following commands in the sequence specified below:
USE GanttMultiuser
DBCC SHRINKFILE (GanttMultiuser_log, TRUNCATEONLY ) go BACKUP LOG GanttMultiuser WITH TRUNCATE_ONLY
go

/* Select simple recovery model - e.g. no transaction log file */
ALTER DATABASE GanttMultiuser SET RECOVERY SIMPLE
GO
exit
The following command (stored procedure) can in the osql utility program be used to query the current status, log file names etc. for the GanttMultiuser database.
exec sp_helpdb GanttMultiuser
go
exit
Custom changes to ROB-EX Multiuser Server
This paragraph explains areas of ROB-EX Multiuser in which custom specific changes can be made for specific customers
Changing size of description fields
ROB-EX Multiuser server supports that the default column size for selected database columns can be manually changed. The following columns can be changed:
| Table | Column | Type | Default size |
| EProductionOrder | Description | VARCHAR | 50 |
| CustomText1 – CustomText8 | VARCHAR | 100 | |
| Name | VARCHAR | 50 | |
| EOperation | Description | VARCHAR | 100 |
| CustomText1 – CustomText4 | VARCHAR | 100 | |
| Name | VARCHAR | 50 | |
| Properties | VARCHAR | 100 | |
| ERawMaterial | CustomText1 – CustomText2 | VARCHAR | 100 |
| EProduct | Name | VARCHAR | 50 |
| EResource | Description | VARCHAR | 100 |
| Specifications | VARCHAR | 100 | |
| AltHierarchy | VARCHAR | 100 |
To manually change the column sizes for selected columns the SQL command
ALTER TABLE <Table> ALTER COLUMN <Column> <Type>(<Size>)
must be executed for each column going to be changed. The values <Table>, <Column>, <Type> and <Size> must be taken from the table listed above.
To execute SQL command start the osql utility by selecting “Start/Run…” and enter the command “osql -U ganttAdmin”
Enter the ganttAdmin password and then enter the following commands in the sequence specified below:
USE GanttMultiuser
go

/* change column size for EOperation.Description to 200 rather than default of 100 */
ALTER TABLE EOperation ALTER COLUMN Description VARCHAR(200)
go
exit
To verify the existing size of a column use the build in sp_columns stored procedure. Example listing the settings of column “description”:
USE GanttMultiuser
go
/* Verify current column setting for table EOperation */
exec sp_columns @table_name='EOperation', @column_name='description'
go
exit
Running custom sql scripts
Custom sql scripts, that should be run before the scheduler server starts, may be placed in the ganttServer\server\gantt\conf\sql.init folder. Requirements are that:
- Existing files should not be modified as the will be overwritten in a later update.
- Files should end with “.sql” and that “;” is not inside begin end statements as it trigger a execute of a statement.
Changing service ports
By default the following service ports are used by the ROB-EX Multiuser server application:
- 11099 (naming service – this is the port number used by ROB-EX clients)
- 11098 (RMI)
- 8080 (internal web-server for user administration)
- additional misc. ports used are: 8083, 4444, 8093, 8009
In case of firewall issues, inbound/outbound rules can be set up in Windows Firewall to allow communication through these ports while keeping Windows Firewall active.
As explained in section “Licensing the client” an inbound rule may have to be applied in order for the clients to contact the license server.
These port numbers have been selected since they are known not to conflict with other typical programs running on Windows servers. However a conflict on a port may happen (check the log file to see what port is having problems). In these cases the port numbers used by ROB-EX Multiuser server may be changed in the following way (note the exact method varies between the original ROB-EX version of your install – as explained below):
- Stop the Multiuser server service (Run->services.msc)
- Open file ganttServer\conf\gantt-bindings.xml. All ports and for all server instances can be changed in one place in this file. Use the search facility of the text editor to
- first find the part relevant for the Server Instance you want to change. For server instance 1 search for “ports-01”, etc.
- search forward from this point, locate the port no. to change
- save the file
- If file “ganttServer\conf\gantt-bindings.xml” is not available (typical for installs earlier than 5.2 or updated from an earlier version to 5.2), then instead
- edit the file “ganttServer/server/ganttX/conf/jboss-service.xml” (X is the instance you would like to change). Verify the setting of “StoreURL”.
- if the value is “../conf/gantt-bindings.xml” then change it to “../server/ganttX/conf/gantt-bindings.xml” (X is the instance you are editing).
- Now edit the port settings using the file “ganttServer/server/ganttX/conf/gantt-bindings.xml” (X is the instance you are editing)
- save both files
- edit the file “ganttServer/server/ganttX/conf/jboss-service.xml” (X is the instance you would like to change). Verify the setting of “StoreURL”.
- As a last option this is also supported (might be necessary for installs with origin prior to ROB-EX 4.0)
- edit ganttServer\server\gantt\deploy\jbossweb-tomcat50.sar\server.xml – change web-service ports 8080 and 8009 in this file
- edit ganttServer\server\gantt\conf\jboss-service.xml – change jboss service ports 11099 and 11098 from this file
- save both files
- Finally start the Multiuser Server service again
Post your comment on this topic.