
ROB-EX Shop Floor allows the user to view the current production schedule using a standard internet browser.
Table of contents
- Introduction
- Edit group
- Edit user
- Start the web server
- Log on the web server
- Setup appearance
- The job list
- Order details
- Operation details
- Reporting progress
- Editable fields
- Enable direct edit of attached files
- Known restrictions
Introduction
On-line with the production department
ROB-EX Shop Floor enables on-line connection between the actual plan and terminals in the production. ROB-EX Shop Floor shows the actual plan from ROB-EX in the production. The operators can see the plan and report start and end of jobs. The reports made by the operators are updated in ROB-EX.
Changes in ROB-EX and ROB-EX Shop Floor are synchronized immediately both ways.
Individual user adjustment
Users can be
- attached to a group and will inherit the permissions from the group he is assigned to. More users can be assigned to the same group.
- assigned to more permissions than the group has been assigned.
- assigned to permissions to view or change information.
- assigned to permissions to see the job list for one individual resource. The ROB-EX Shop Floor job list will then show only the information that the user needs.
Users are defined and assigned to permissions in the ROB-EX menu “Functions – User management”.
Edit group
A new group is made like this:
- Select “Functions – User Management – Edit groups” in the ROB-EX menu.
- In the window Groups select “New group”.
- Enter group name and name in the window.
- Press the button “Edit permissions” for assigning permissions to the group.
- Select the groups of attributes listed in the left side of the window that the user should have permissions to. Press the button in the top of the window showing an arrow pointing to the right to transfer the attributes to the list to the right. The list to the right shows the attributes which the user have read permissions to.
- Edit the list to the right. Remove the checkmarks next to the attributes which the group is not allowed to see. Refer to the list of editable attributes in chapter the Editable attributes”.
- Put a check mark in the Write column for each attribute the group have write permissions to. Put a check mark in the write column for the webpage that the writeable attributes belongs to. Example: If the group is allowed to change status for an operation write permissions must be given to the attributes “Operation.Status Chooser” and “Web page.Operation Details”.
- When the changes are made press the “Close” button. The information is saved.
Please notice: if the permissions are changed for a group, the changes applies to all users attached to the group.
Edit user
Users can be assigned to individual permissions or can be connected to a group. If connected to a group, permissions are inherited from the group. If a user is assigned to a group, extra permissions can be added to each individual user. A user can be assigned to more individual permissions than inherited from the group but not less.
- Open the dialog “Users” by selecting “Functions – User management”. In the list to the left the users entered into the system are shown.
- Select “New user” and enter username ( e.g. initials) and name of the user.
- Press the button “Change password” and enter the users password. Press “Close” to close the window.
- Set the user active by pressing “Yes” when asked “Shall the user be active”. A check mark is set in the box “Active” in the window “New user”.
- Assign a user to a group by putting a check mark in the box which belongs to the group in the right side of the window in the list “In group”. Please refer to the chapter Edit group” for guidance in making groups.
- If the user is assigned to a group, the user inherits the permissions which are assigned to the group. If more permissions are wanted, these can be added using the function “Edit permissions”. Go to point 8.
- If the user is not assigned to a group:
- Press the “Edit permissions” button.
- Select the groups of attributes, listed in the left side of the window, that the user should have permissions to and press the button showing an arrow to the right. The list to the right shows the attributes that the user has read permissions to.
- Edit the list of assigned permissions. Only check marks next to permissions that the user should be assigned to read.
- Put a check mark in the Write column for each attribute the user have write permissions to. Put a check mark in the write column for the webpage that the writeable attributes belongs to. Example: Let the user change the status for operations: Add write permissions to the following fields “Operation.Status Chooser” and “Web page.Operation Details”.
- When the changes are made, press the Close button. The changes are saved. Go to point 9.
- If the user is assigned to a group:
- Press the button “Edit permissions”. Please notice the list shows only the permissions which are assigned to the user and not the permissions which are inherited from the group.
- Assign the permissions to the user and press the button “Close”.
- The user is now set up and is able to log in using a web browser.
Start the web server
The Web server is started from the Gantt menu “Shop floor – Start server”.
In the Gantt plan’s lower right corner the web server status is shown:
- During startup: “Shopfloor starting”.
- When the server is running: “Shopfloor running”.
- When the server is stopped: “Shopfloor stopped”
The web server must be running in order to let the users logon.
Log on the web server
- Start a web browser and enter the address for login page page on the web server. For example:
where localhost is the name or IP-address of the server where the web server runs.
The login page is shown.
- Enter username and password and press the “Log in” button.
The start page is shown.
Setup appearance
In the web browser, setup which resources the user should see in the job list. This is also possible from the Edit permission dialog in the ROB-EX menu “Functions – User management”.
- Press the “Control panel” button in the top of the window.
- Put a check mark for each of the resources to be shown in the job list.
- Save the setup by pressing the Save button. Select Start page from the menu.
If the Shop floor user should not have access to edit which resources to be shown in the job list, do the following:
- Log off the Shop floor user.
- In the ROB-EX menu “Functions – User management – Edit users”, remove the read permission for “Web page.Control panel” in the window “Edit permission”. Please refer to chapter Edit user.
- Log in the Shop floor user. If the Shop floor user activates the control panel, Shop floor ask for login and password.
The job list
The job list shows information, sorted per resource for a specified period. Information about:
- Order
- Operation
- Customer
- Product
- Planned start- and end date
- Status
- Quantity
- Order text
Show an order list:
- Set the start- and end date in the fields Start date and End date.
- Press the button “Update” in order to update the job list.
- Click on a order number to see details for an order.
- Click on a operation in an order to seedetails for an operation.
Order details
Click on a order number in the job list to see details for an order.
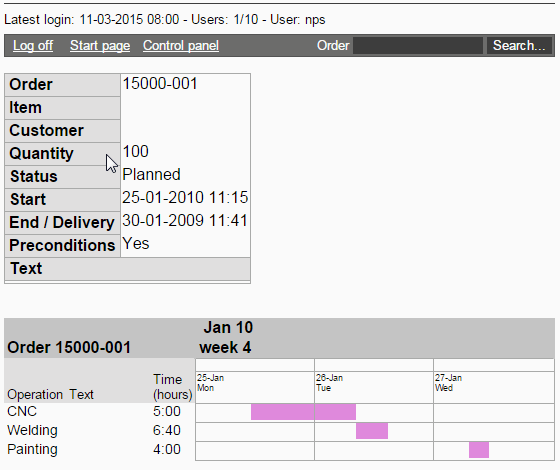
For each order the attributes selected for the actual user are shown. Please refer to chapters Edit users and Edit groups above.
In the example shown above it is possible to change Quantity, Status and Order text.
Below the details section, a Gantt chart for the selected order is shown. See details for an operation by clicking on the operation in the Gantt chart.
The user makes the changes and presses the “Save” button. The changes are updated in the planners Gantt chart.
Operation details
Click on an operation in the Job list or on an job bar in the Gantt chart in the order details window, in order to see details for an operation.
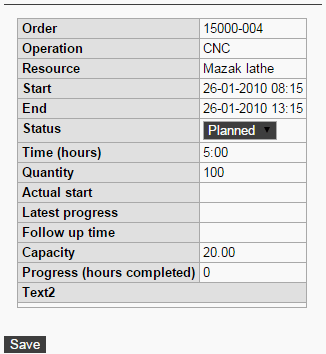
For each operation the attributes selected for the actual user are shown. Please refer to chapters Edit users and Edit groups above.
For each operation the operator can report different information back to the Gantt plan, e.g. status. The operator makes the changes and presses the “Save” button. The changes are updated in the Gantt chart.
Reporting progress
The operation must have status “Started” in order to report progress (partial completions). So it is important to switch status of the operation to started.
Reporting start of an operation:
- Find the operation in the job list in ROB-EX Shop Floor and click on the operation shortcut. The operation windows opens. All white fields are editable.
- In the field “Actual start” enter the actual start time of the operation.
- In the list “Status” the operator select “Started”.
- Push the Save button. The information is updated in ROB-EX.
Reporting progress (partial completions):
- Find the operation in the job list in ROB-EX Shop Floor and click on the operation shortcut. The operation windows opens.
- Set the status of the operation to Started as described above, if it doesn’t have this status now.
- Set the Follow time to the time where the progress is measured.
- In the Progress field, enter the quantity finished. E.g. 50 pieces.
- Press the Save button. The information is updated in ROB-EX.
Instead of reporting quantity finished, it is possible to report hours or % by enabling the right fields of the page.
Editable fields
The editable fields are listed below. Please notice that both the field and the webpage in which it appears must be set editable.
Example. Set the operations text editable. Assign write permissions to the following attributes:
- Operation.Description
- Web page.Operations detail
Production order
| Editable field | Add permission to the field | Assign permissions to the webpage |
|---|---|---|
| Product/Item | Production order.Product name | Web page.Production order |
| Customer | Production order.Customer | |
| Quantity | Production order.Quantity | |
| Status | Production order.Status Chooser | |
| Start | Production order.Planned start time | |
| End/Delivery | Production order.Delivery date | |
| Preconditions | Production order.Precondition flag | |
| Text | Production order.Description |
Example:
The example shown below shows:
- production order attributes available in ROB-EX Shop Floor
- production order attributes which can be assigned write permissions in ROB-EX Shop Floor
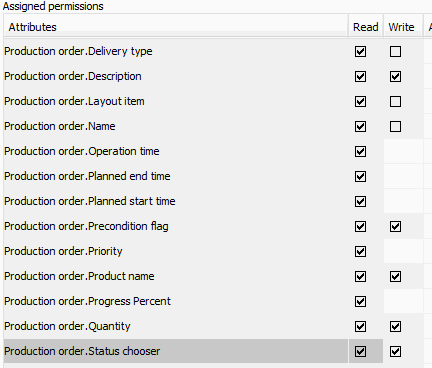
Other attributes can be editable by changing the setup of the pages. Please contact your ROB-EX dealer or ROB-EX A/S for further description.
The selected attributes results in the following production order window in ROB-EX Shop Floor:
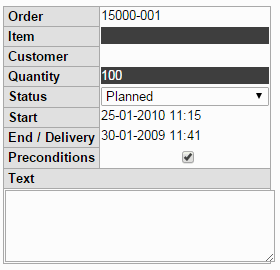
The example shows that the fields
- Item
- Quantity
- Status
- Preconditions
- Text
are editable.
Operation
| Editable field | Add permission to the field | Assign permissions to the webpage |
|---|---|---|
| Resource | Operation.Resource | Web page.Operations details |
| Start | Operation.Start time | |
| End | Operation.End time | |
| Status | Operation.Status Choser | |
| Actual start | Operation.Actual start time If nothing entered, this is set to planned start time. |
|
| Follow time | Operation.Last progress time (auto time now) If nothing entered, this is set to planned start time. The field is editable when the operation has status started and this status is saved. |
|
| Progress (hours) | Enter progress in hours | |
| Progress (pcs) | Enter progress in quantity | |
| Progress (%) | Enter progress in percent | |
| Text | Operation.Description |
Example:
The example shown below shows:
- operation attributes available in ROB-EX Shop Floor
- operation attributes be assigned write permissions in ROB-EX Shop Floor

Other attributes can be editable by changing the setup of the pages. Please refer to the Shop Floor configuration pages or contact your ROB-EX system integrator.
The selected attributes results in the following operation window in ROB-EX Shop Floor:

The operation must have status equal to Started before the fields “Follow time” and Progress are editable.
The field “Follow time” shows the actual time. The field is editable.
Resources
The Job list and the Control panel in ROB-EX Shop Floor can be setup to show only the resources necessary, for each resource.
Example: Assign permission to see the resources Mill 1 and Mazak lathe:
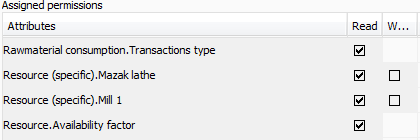
Do not assign permissions to the attribute Resource (specific).All, if not all resources must be shown.
If the read permission to the attribute “Web page.Control panel” is removed, the Shop Floor user is not able to add or remove resources to the view.
It is also possible to filter resources from Shop floor by adding the resource property ‘exclude_from_shopfloor’ and setting it to true. This will remove the resource and any sub-resources from Shop floor (Available from 7.2 build 143).
Shopfloor security
For more on using secure networking communication in the setup, please read Secure networking communication – SSL, Shop Floor
Enable direct edit of attached files
NOTE: The following functionality does not work for local files due to security measures in browsers!
When clicking on attached files in Shopfloor, it is possible to enable edit of these files in their assigned default program (For info on attached files, see Attached documents).
This functionality is default enabled when using Internet Explorer (IE) or Edge for pdf, xls, xlsx, doc and docx files. To change this, find the settings shopFloorDirectEditSupportedBrowsers and shopFloorDirectEditFileExtensions in GanttSetup.properties (For info on how to change GanttSetup, see Miscellaneous configurations) and change the values to the desired.
Ex: If you want to enable this only when using Internet Explorer and pdf files and word documents, use the following settings: shopFloorDirectEditSupportedBrowsers=IE and shopFloorDirectEditFileExtensions=pdf, doc, docx (Changes will not take effect until Rob-ex is restarted). With these settings, when clicking an attached word document from Shopfloor using Internet Explorer, the word document will be opened in the default editor, e.g. Microsoft Word, using the remote location. The file can now be edited and save and the changes will be reflected on the remote file.
Below is an overview of the settings:
| Name | Possible values | Description |
| shopFloorDirectEditSupportedBrowsers | IE, EDGE | The browsers where the direct edit functionality should be enabled. |
| shopFloorDirectEditFileExtensions | All file extensions | The file types where the direct edit functionality should be enabled. |
Known restrictions
Firewalls
Do not run a personal firewall like ZoneAlarm or the one that comes with Windows, on the PC that runs Shop Floor Web server. Running a firewall may prevent access to the Web server that delivers the data for the Shop Floor pages. Symptoms may be that the web pages are not shown or the user is asked to enter password each time another webpage is selected.
Port 80 is used by other programs
The error is that the ROB-EX web server doesn’t start up fully. In the status line at the bottom of the main Gantt window it says “Shopfloor starting”.
The ROB-EX Web server port number can be changed this way:
- Edit the file server.xml in the catalogue planner\plugins\shopfloor\site\conf in the ROB-EX catalogue.
- Search for the text “port=“80” minProcessors”. Replace 80 by e.g. 9080.
- In order to log in from the Shop Floor client the port number must be present in the address:
localhost:9080/index.jsp, where localhost must be replaced by name or ip address of the server.
Note port and scheme can be specified also from the following startup parameters, which overrides the values from the server.xml file
-Dgantt.shopfloor.port=- Specify port number, e.g. 9080. This is useful if multiple integration clients need to run Shop Floor. However make sure each integration client in that case uses unique custom directories (startup option
-Dscheduler.custom.dir="<directory>"), since user configuration is stored in the custom folder under the same filename. -Dgantt.shopfloor.scheme=- Specify either
http(no TLS encryption) orhttps(with TLS encryption). For furhter reading about securing with TLS, see this section.
Post your comment on this topic.