
Page Content
Introduction
When enabled, the REST Server, provides the user with a REST Based Client API (a set of web-services). This allows for custom integration with ROB-EX as well as being the foundation layer for modules like Time Tracker. Some services provide options to create, read, update or delete basic objects in ROB-EX (e.g. Operation, Resource, ProductionOrder etc). Other high level services allows for e.g. the creation and re-scheduling of orders and operations. The input and output from the REST server is using the JSON format . For a complete set of services, see the REST API documentation
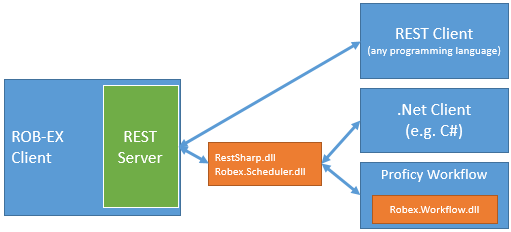
The services available from the REST API have also been implemented as a .NET Assembly deployed as Robex.Scheduler.dll (see drawing below). The Robex.Scheduler.dll communicates with the REST Server through the REST API thus hiding all the REST details. For further information, including getting started examples in C#, see the .NET Client documentation.
A third option is to program a client using Proficy Workflow using the supplied ROB-EX Scheduler Workflow Client. With this service provider installed into Proficy Workflow, all the services are easily available inside Workflow. For further information regarding this, read the ROB-EX Scheduler Workflow Client documentation and also see the .NET Client documentation, since these have identical services/methods.
For an overview of the architecture, see the image below.
The following is a description of how to get the REST Server started as well as doing doing basic work with the API.
DLL files
The DLL files are located in
<sch_client_dir>\plugins\rest\dotnet\bin

RestSharp.dll
Robex.Scheduler.dll  (requires RestSharp.dll)
Robex.Workflow.dll   (requires Robex.Scheduler.dll)
make sure to place these DLL files in a location where they will be located by your .NET IDE and during execution of your .NET deployment.
Requirements
The requirements for using the REST Server are listed below.
- ROB-EX version 5.2 or newer
- License to ROB-EX REST Server (menu Help->Register)
Starting the REST server
The REST Server is incorporated as a module build into the ROB-EX Planner Client. In production is it best practice start the REST Server on a client that runs using the Client run as service option. Note that the REST Server is automatically started when the client is configured to run as a service.
Alternatively, to start the REST Server on any ROB-EX Planner Client, add the following parameters on the ROB-EX exe shortcut (for info on adding parameters on the shortcut see Starting up the client)
-Dgantt.rest=true
-Dgantt.rest.username=
-Dgantt.rest.password=
The selected <username> and <password> are later used when creating connections, so remember the specified user name and password.
Optionally, the port number and host to listen on can be changed using the following parameter, i.e. this is needed in case of running multiple ROB-EX REST Server clients on the same PC or the default port number (see Test connection) is already occupied by another application:
-Dgantt.rest.portnumber= (default=9998)
-Dgantt.rest.host= (default="0.0.0.0" = all)
If the REST api is used from browsers the browser will check for “cross domain resource sharing” (http://enable-cors.org/index.html), Per default the rest service will allow rest calls from all domains (“*”) to control which domains to allow calls from use the setting below:
-Dgantt.rest.allowOrigin= (default="*")If the server has been started properly, the following output should be visible in the log-file:
RestServer init called
Run rest service: true
Rest server scheme=http
Rest server hostname=
Rest server portnumber=
Test connection
For testing purposes we recommend using a Chrome >For testing purposes we recommend using a Chrome App called Postman, see setup instructions below.
To test that the connection to the REST Server is working try accessing the following URL from within the Postman App: http://<*hostname*>:<*portnumber*>/scheduler/v1/service. Where <hostname> is the hostname of the machine where the REST Server is running and <portnumber> is the selected port number (default is 9998).
If the REST server is working, this will now display info regarding the ROB-EX client (e.g. version number, memory consumption, etc.).
Setting up Postman
- Install the Postman App into Chrome (Apps->Web Store->“Postman REST Client”)
- To access the REST API there are some settings that need to be set in Postman. The HTTP method calls uses basic authentication. This can be set at the top op Postman in the tab called Basic Auth. After setting the username and password to the values chosen during startup of the REST Server, click the Refresh headers button. This will add an authorization header to the HTTP calls.
- Also is it necessary to set the content-type in the HTTP headers to application/json. If the headers are not visible, they can be accessed from the headers-button at the top right-hand side of the screen.
FAQ / Troubleshooting
The REST Server did not start
Search in the log for a line similar to: “Unable to start REST Server on http://<hostname>:<portnumber> java.net.BindException: Address already in use: bind”.
If this line is present in the log, then the error is most likely that the provided portnumber is already in use. Select another port number and try again.
I get a “401 Unauthorized” message
This can be caused by one of two things:
- The username or password was not set. In this case there should also be a message saying “Authentication credentials are required”. Check that the commands added to the shortcut are spelled properly.
- The username or password was wrong. In this case there should also be a message saying “Invalid username or password”. Check that the username and password chosen during startup of the REST Server are the same as provided to Postman.
Post your comment on this topic.