
The first time you start a ROB-EX Desktop Planner, a wizard will pop up, asking you to register and activate your license.
The first step is to select a license type.
- The Floating license is the recommended and default way to deploy ROB-EX Scheduler in a multiuser environment. This option will let you
- activate a Floating License Server (only needs to be carried out once). Read more here about installation of the License Server
- obtain and release client licenses from any PC on the company network.
- The Local license will let you register a license locally on the machine. You will only use Local licenses if you are working offline “In the field”.
- The Trial license will let you run ROB-EX Scheduler in a trial version (qualified users only).

Floating license
Choosing this will get you to a connection page.
- Enter the hostname and port number of the machine hosting the floating license server.
- The server PC was chosen at installation of the License Server – your local system administrator will know this.
- Below the hostname and port, there is an input field for a lease group, this is optional. Your local system administrator will provide this if needed, for more info on the configuration of the leasing group, see Configuring Floating License Server. The leasing group can also be set using the -DLeaseGroup parameter on the shortcut.
![]()
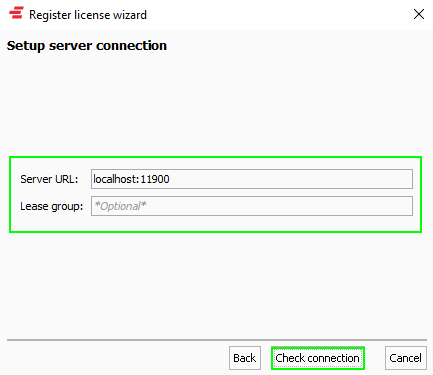
- Now click the Check connection button to check for a valid connection to the floating license server. If the connection is ok, the Next button will be enabled and will take you to the status page.

If the floating license server has not yet been activated, the Activate button will be visible.
- Clicking the Activate button will show a form requesting you to type in your license key, name, company, and email.
- Clicking OK will get you back to the status page, showing the status of the license matching the entered license key.

The next time a user visits the status page for the floating license server, the server will now be activated and the user will receive a client license (e.g. Planner or Viewer). If no free client licenses are available, a list of currently logged-in users will be displayed. I.e. letting you know who to contact in case you would like to ask a user to close their ROB-EX Scheduler client.
Local license
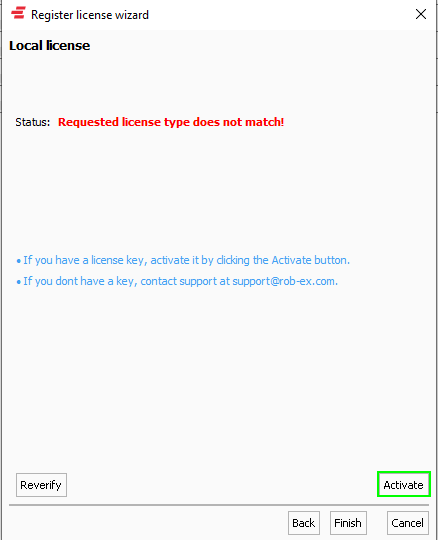
Choosing this will get you to a status page, where it will show the current status of your license. If this is the first time you are running the wizard, the status will be that you have no license and you will be able to activate a license using the Activate button.

Clicking the Activate button will show you a form requesting you to type in your license key, name, company, and email.
Clicking OK will get you back to the status page, showing the status of the license matching the entered license key. Click “Finish” to complete the licensing.
Trial license (qualified users only)
Contact your ROB-EX Scheduler partner to learn if you qualify for a trial version. Choosing the trial option will get you to a status page, showing the status of the current trial. If this is the first time selecting a trial, you will be able to start a trial using the Start trial button.
A trial will allow you to run the trial version of ROB-EX Scheduler for 21 days. The trial version cannot connect to a ROB-EX Scheduler Multiuser Server. If your trial has expired, you will get the option to extend the trial by clicking the Ext. trial button. This will require an extended trial license key, which may be generated and emailed to qualified users, only on request to your ROB-EX Scheduler partner.
Completing the activation
When a license has been activated (using one of the above types) and the status page has been shown, the Finish button will be visible. Clicking the Finish button will close the wizard and the next time ROB-EX Scheduler is started, it will startup using the activated license and not show the wizard.
Once the client has been activated, we recommend that you follow the getting started chapter of this manual.
Relicensing
If you are running e.g. a trial version of ROB-EX Scheduler and have received your permanent license key, the client can be relicensed by following the steps below.
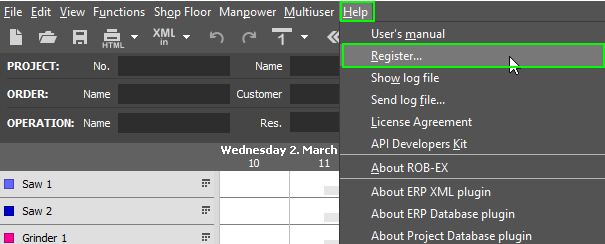
- Open Rob-ex and go to menu Help -> Register.
- Click the Relicensing button.

- Click the Activate button.
- Fill out the form, the license key you get from Rob-EX support or partner.
Important: When making changes to the license, the client will have to be restarted in order for the changes to take effect.
Re-verifying the license
If you have made changes to your current license, e.g. purchased more planner clients, the license needs to be re-verified. This can be done from the status page of the registration wizard.
Open the wizard by navigating to Help->Register and click the Relicense Application button. Go to the status page by selecting your license type. The status page should have a Reverify button. Clicking this will update the license and the status page should update to reflect the changes.
Important: When reverifying the license, the client will have to be restarted in order for the changes to take effect.
Post your comment on this topic.