
Different options can be passed to the ROB-EX Gantt.exe file to further control the different features of the product. By specifying -help or /? on the command line the different possible options will be displayed.
The options are passed to the .exe file by right clicking on the shortcut to ROB-EX Gantt.exe and select “Properties”. In the “Target” field append options outside the .exe enclosing ".
[<language> <REGION>]
This setting selects the run-time language of the client. I.e. the language of text on labels, menus, buttons, etc. To select a certain language and the regional setting, add the locale parameters as shown below. In the example the parameters "en IE" (case matters !!!) added to the Target line will start a client with English (en) language using Irish (IE) regional setting.

The User’s Manual will always be in English – no matter what the selection of the Runtime Language is.
For further details, including supported languages, read Selecting the runtime language.
-muprofile "profile_name"
Selects multiuser profile at startup. The multiuser profile contains the combination of server name, user, password and site. The profile is created/edited from Functions->Settings->General tab Multiuser. This will allow a user to log into e.g. the production environment with one shortcut and to the test environment using another shortcut.
To share multiuser profiles between many different users
- Create a profile on one client
- Export the profile using Functions->Settings->General->Files: “Edit templates” (other users starting from the same location will be prompted to import the profile the next time they start up the client).
This will generate a file <sch_dir>\custom\muProfiles.xml that can be further hand edited in a text editor. The keyword {user_name} can be inserted as login (see example below), and will during login, to the Multiuser Server, be replaced with the users login name from Windows. The users must all share the same password.
<multiuserProfile accepted="false" active="false" loginEditable="false" majorVersion="2" minorVersion="0" name="production" passwordEditable="false">
  <contextFactory value="org.jnp.interfaces.NamingContextFactory" />
  <providerUrl value="robexsrv01:11199" />
  <login value="{user_name}" />
  <password value="myPassword" />
  <autoLogin value="true" />
  <siteId value="stdSite" />
  <winAuth value="false"/>
</multiuserProfile>
Another option is to use Windows Active Directory as the authentication method (see example below). The Multiuser Server Admin Guide describes how members of a Windows AD group can be configured to have access to the ROB-EX Scheduler server.
<multiuserProfile accepted="false" active="false" loginEditable="false" majorVersion="2" minorVersion="0" name="production" passwordEditable="false">
  <contextFactory value="org.jnp.interfaces.NamingContextFactory" />
  <providerUrl value="robexsrv01:11199" />
  <autoLogin value="true" />
  <winAuth value="true" />
  <siteId value="stdSite" />
</multiuserProfile>
-site "site_id"
When connecting to a ROB-EX Scheduler Multiuser Server, this parameters will specify the site id to connect to. This parameter overrides any site specified as part of a possible multiuser profile (see the -muprofile parameter above). Can also be specified as a parameter -Dgantt.site="site_id".
The user must have read access to the site_id specified (refer to Multiuser Server Admin pages how to configure this), otherwise, login to the site is not possible.
-siteUniqueUserHome
ROB-EX Scheduler client will startup up with robex home folder being set to %userprofile%\robex\XX, where %userprofile% is the users home folder (e.g. c:\users\<user>) and XX is the site id specified with startup parameter -site "XX"
In a multi site ROB-EX setup, each user will typically prefer a different local setup for different sites, i.e. different configurations of columns, window sizes, startup view etc. The normal approach for this is to add startup parameter -Dscheduler.user.home="%userprofile%\robex\XX", where XX is the site the user is logged into. We’ve experienced several problems with e.g. some Citrix versions not being able to expand an environment variable like %userprofile%. Also, it is often challenging to stay below the max character limit of 255 characters enforced on Windows shortcuts.
Usage:
- Add parameter
-siteUniqueUserHomeas startup parameter - Add parameter
-site "XX"(do not use-Dgantt.site="XX"in combination with-siteUniqueUserHome) - Remove any use of startup parameter
-Dscheduler.user.home="XXX"
Only available from 7.0.0.424 and later. The startup parameter -help will display “ROB-EX Gantt.exe” or “ROB-EX Viewer.exe” launcher v1.018 or later.
-console
An extra console window with detailed log-messages is started together with the normal client window. The output to this window can be used for debugging purposes.
-test
Use this parameter to diagnose problems with Java. I.e. a user runs the “ROB-EX Gantt.exe” but ROB-EX is unexpectedly not started. On start problems with Java is diagnosed and info about the problem is displayed. Added in v1.013 of the launcher. See more in the Startup caching section.
-nocaching
When “ROB-EX Gantt.exe” is started across a network connection, then both class files and a possible embedded Java is by default cached on the local users hard drive (see more in the Startup caching section). This will make the startup faster and will eliminate problems which may arise because of unstable network connections, between the client and the file server. Any update to files on the server, is automatically detected and synchronized by ROB-EX Gantt.exe. If you experience problems with the caching, add this parameter to the startup shortcut. This way ROB-EX is started directly from the network share without the local cache. Added in v1.013 of the launcher.
-preferJavaVersion "1.7|1.8|…"
If specified – then this specific version of Java is attempted located. The architecture is controlled by the strategy applied for -preferJavaArchitecture. If the preferred version is not available, a possible default Java runtime is silently selected.
Also see examples below in description for -preferJavaArchitecture
-preferJavaArchitecture "32|64"
If -preferJavaVersion is not specified, then the registry is searched for both a 32-bit and a 64-bit Java Runtime. If both exist – then the run-time with the highest major version is selected. If they have the same version, then the 64-bit Java is preferred to the 32-bit.
If 32 or 64 is specified as an argument to this option, then that architecture is preferred. If you specify 32, but only a 64-bit Java is available, then the 64-bit Java is used without any warning to the user. Vice-versa if you specify 64, but only a 32-bit Java is available.
Examples:
- (no options): Start on the highest Java version available, regardless of Java architecture
- -preferJavaVersion 1.7: Start on Java 1.7 (a 64-bit Java is preferred to a 32-bit)
- -preferJavaVersion 1.7 -preferJavaArchitecture 32: Start on Java 1.7 32-bit
- -preferJavaArchitecture 64: Start on the latest installed 64-bit Java
-runMacro:[name_space.]<macroName>
After complete startup of ROB-EX Scheduler client, the specified macro will be executed. Learn more about macros.
The name of the macro is specified as [name_space.]<macro name>. If the namespace is left blank the default namespace is main., this is the domain containing user created macros from menu Functions->Macro.
Example: -runMacro:myMacro
Will run the macro name "myMacro" from the main. macro namespace.
Running multiple ROB-EX Scheduler clients with individual environments
-Dscheduler.user.home="<directory>"
Changing default location of “user settings” area. Logfiles and user related settings (e.g. settings in Functions->Settings->General, view layouts etc.) are by default saved in the users home directory on the computer, by default the c:\users\<user name>\robex directory. This location can be changed with a parameter on the shortcut to the “ROB-EX Gantt.exe” file, enabling a ROB-EX Scheduler client to be started with different settings for e.g. a production and a test environment.
Right click on the shortcut to “ROB-EX Gantt.exe” and select “Properties”. In the “Target” field add the -Dscheduler.user.home attribute as shown below.
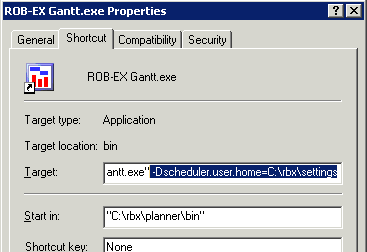
With this startup setting ROB-EX Scheduler will locate or create the directory ‘robex’ in the specified location and create subfolders for log files, property files etc.
-Dscheduler.custom.dir="<directory>"
Changing default location of “custom” area. This explains how clients can be configured to run on the same client codebase (e.g. \planner) but with different “global” configuration options (e.g. \custom). As an example a company runs ROB-EX Scheduler clients on two different sites – the desired deployment configuration is to maintain only one ROB-EX Scheduler client codebase, but it is impossible that the two sites can be configured in exactly the same way.
The solution is that each site starts “ROB-EX Gantt.exe” with different startup parameters. The location of configuration files that are shared between all clients is by default set to \custom, where is e.g. “c:\program files\robex\planner”. This location can from ROB-EX Scheduler 4.2 build 264 and newer be specified using the shortcut parameter option -Dscheduler.custom.dir=<dir>. It is recommended and best practice to create additional custom directories in <sch_dir>\custom, as an example <sch_dir>\custom\site1 and <sch_dir>\custom\site2, since this allows a relative path to be specified.
To start clients on the two different sites place global configuration files in respectively <sch_dir>\custom\site1 and <sch_dir>\custom\site2 and create two different shortcuts:
Shortcut parameter to start site 1: -Dscheduler.custom.dir=.\custom\site1
Shortcut parameter to start site 2: -Dscheduler.custom.dir=.\custom\site2
Example of typical global configuration files are: GanttSetup.properties, HTML Report configurations, Scripts, Published Templates and more
-Dscheduler.log.dir="<directory>"
Changing default “logging” directory. The location of ROB-EX Scheduler log files can be changed by startup parameter -Dscheduler.log.dir=<dir>. By default, the log file is placed in the users -Dscheduler.user.home directory, but especially when deploying ROB-EX Scheduler in a terminal server environment it may for performance reasons be useful to store user settings on a file network share (e.g. p:) but log to a local directory on the terminal server (e.g. d:). In this case, the following two parameters can be specified on the shortcut to start ROB-EX Scheduler:
-Dscheduler.log.dir="d:\logfiles\%USERNAME%" -Dscheduler.user.home="p:\profiles\%USERNAME%"The log file location in ROB-EX Scheduler is in general determined in the following priority
- Startup parameter
-Dscheduler.log.dir - User specified location provided in Functions->Settings->General” on the “File” tab.
- Setting specified in central configuration file GanttSetup.properties
using settinglogfile.location - If none of the above is supplied the default users area is used
(e.g.c:\users\<user name>\robex)
Advanced startup parameters
-DopenZipLog
An option to start ROB-EX Scheduler client based on the content of a LogToRobex zip-file (the log-file created from the client using the Help->Send log file.. menu option). ROB-EX Scheduler client will then be started using the settings and planning file contained in the zip-file. This makes it fast and convenient to start on the exact same setup as the user who generated the LogToRobex.zip file.
Specify option -DopenZipLog on the shortcut starting up the client, and a window will open allowing drag and drop of the LogToRobex.zip file.
ROB-EX will start on the same user profile and custom settings as contained in the LogToRobex.zip file. Note that a possible user plugin is not part of the startup!
-D"Java Property"
Specific properties of ROB-EX Scheduler can be controlled with this option. The different options are described in the product guide where applicable.
Also see later on this page: Changing default locations of user settings, custom area and logging file location.
-cp
Advanced use – load additional Java class libraries during startup
-X"Java VM Extended Option"
Advanced use – will pass options directly to the Java virtual machine at startup. One use of this parameter is to increase the allowed max memory assigned to the client, which might be needed for very large plans. The default is 800 MB. To increase the max memory value to 1200 MB specify -Xmx1200m as a parameter on the startup shortcut line
Post your comment on this topic.