

General overview
The Macro list window (“Functions->Macro->Edit”) enables you to create macros to automate frequently performed tasks. A macro has a name and an associated icon that can be made visible on the main ROB-EX toolbar. It consists of one or more macro lines which are being executed sequentially one by one once the macro is started. Each macro line performs a specific function like opening a file, generating a report etc.
This Example shows one macro named “HTML Report” consisting of a single macro line “GenerateReport”.
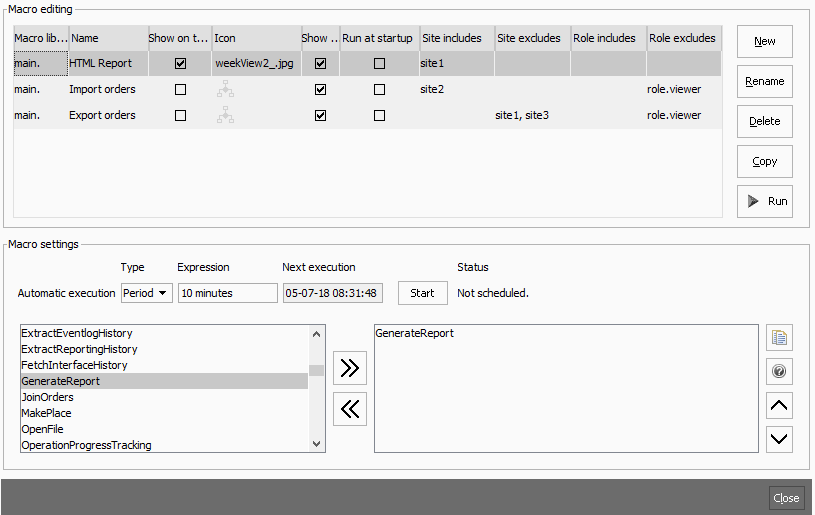
Create and edit a macro
Open the window “Functions->Macro->Edit” and use one of the available functions from the right side command bar.
| New | A new named macro is added to the standard macro library (name space “main”). |
|---|---|
| Rename | Rename and existing named macro |
| Delete | Permanently removes the selected named macro |
| Copy | Copy the selected macro into a new macro with a different names. All macro command lines are copied from the old to the new macro. |
| Run | The selected macro is started once and all macro lines are executed in the sequence listed in the right side Macro settings list. To run macros automatically see the “Automatic execution” option |
Macro options
Name
The name of the macro. Must be unique among all macros
Show on toolbar
If enabled the macro is shown on the Scheduler toolbar on the top right side. A setting in Functions->Settings->General (toolbar section of the Graphs & windows tab) decides the actual appearance of the macros selected to be shown.
Show on orderlist
If enabled the macro is shown on the Order List toolbar on the top right side. Use this for macros configured to process orders that are selected via the Order List. A special API function is used to obtain the orders selected in the order list (gantt.plugin.WindowAPI.getSelectedOrders(DIALOG))
Icon
To change the Icon of this macro double click on the Icon column and navigate to the location of the icon to use. The preferred icon size is app. 20×20 pixels and it should be no more than 24×24 pixels
Show progress
If enabled a window is shown while the macro runs with information about the macro progress and status.
Run at startup
If enabled the macro will be executed once right after startup when the plan has been loaded
Site includes
Specify here a comma separated list of site names. A macro is then only visible to users logging in to one of the specified site ID’s. These options will only have any effect if logged in to the ROB-EX Multiuser Environment and more than one site has been configured.
Each site specified is interpreted as a regular expression. As an example specifying “US_.*” will allow access to all sites starting with “US_”.
Site excludes
Works similar to the “Site includes” option described above, except that the macro is only available for users not logging into one of the specified site ID’s.
It is only possible to specify either site includes or site excludes. If values are provided in both fields, only the “site includes” value is used
Role includes
Works similar to the “Site includes” but on the user role level. I.e. the macro will only be available to users with a certain multiuser role. These options will only have any effect if logged in to the ROB-EX Multiuser Environment.
It is supported to specify a comma separated list of different role names (including regular expressions). The following are valid role name values for this field.
role.admin
role.pro
role.pro.limited
role.standard
role.standard.limited
role.light
role.light.limited
role.viewer
webplanner
So as an example if “role.admin, role.pro” is specified, the macro will only be visible to users assigned to those two roles.
The webplanner role is a special keyword mainly to be used in the Role excludes part, to avoid certain macros from showing up in the Web Planner (regardless of what role the user has)
Role excludes
Works similar to the “Role includes” option described above, except that the macro is only available for users not belonging to any of the specified roles.
It is only possible to specify either role includes or role excludes. If values are provided in both fields, only the “role includes” value is used.
Macro settings
This lower part of the window is used when adding, removing or editing the individual macro lines
Automatic execution
Use these options to execute the currently selected macro at timed intervals. Two different options of configuring the interval rules are available
| Type | Description | Example expression |
|---|---|---|
| Period | Use this option for simple execution with equal times between them. E.g. every 10 minutes. As listed in the examples column, note how you can combine e.g. hours and minutes. You verify how the expression is interpreted by viewing the result in the Next execution field | 10 minutes2 hours2 hours2 days1 hour 30 minutes |
| Cron | Use this option for advanced execution on specific hours, days etc. This type of expression must follow the Cron format, which is a commonly used tool for time-based job scheduling. A cron expression is made of five fields being respectively minute (0 – 59), hour (0 – 23), day of month (1 – 31), month (1 – 12) and day of week (Sunday=0 to Saturday=6). Rest the mouse on top of the Expression field for help. You verify how the expression is interpreted by viewing the result in the Next execution field |
|
The field Next execution holds the date and time of when the macro will be executed the next time.
Once the rules are configured click the Start button and the “Status” will change from Not scheduled to Scheduled. A Scheduled macro will resume to run automatically as soon as the ROB-EX Scheduler client starts up. Scheduled macros are the way to drive automatic jobs on Integration Clients.
Creating and editing macro lines
Each macro line performs a specific function like generating a report, changing to a predefined view etc. Adding macros lines to a named macro allows frequently performed steps to be automated.
Each macro line consist of a name for the function it performs, e.g. GenerateReport. The left side panel in the Macro settings area lists all the available macro lines (functions) that can be used to build a named macro. By using the right and left arrows macro lines can be added or removed to the right side list showing the currently selected macro lines.
To change parameters for a specific macro line double click on the line in the right side list which will bring up the Macro line parameter editor.
The parameter “enable” is common among all available macros. Switching the value from true to false will cause the macro execution to skip that step, so this parameter is useful during creation and testing of a macro.
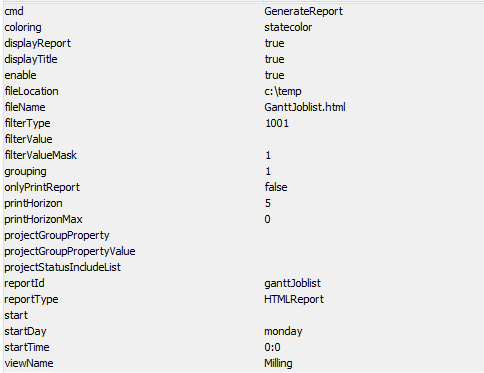
To change a parameter value double click in the right side column on the field you want to change and enter the desired value.
Post your comment on this topic.